I chose the word shadow from the exam paper as i found it very interesting and i felt like i could get really creative with the way i worked with shadows and other techniques. I started off with 3 strands with 3 different ideas that all link around shadows and then i will decide which i want to develop further.
Strand 1
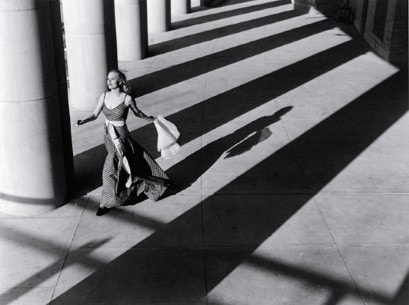
mads perch
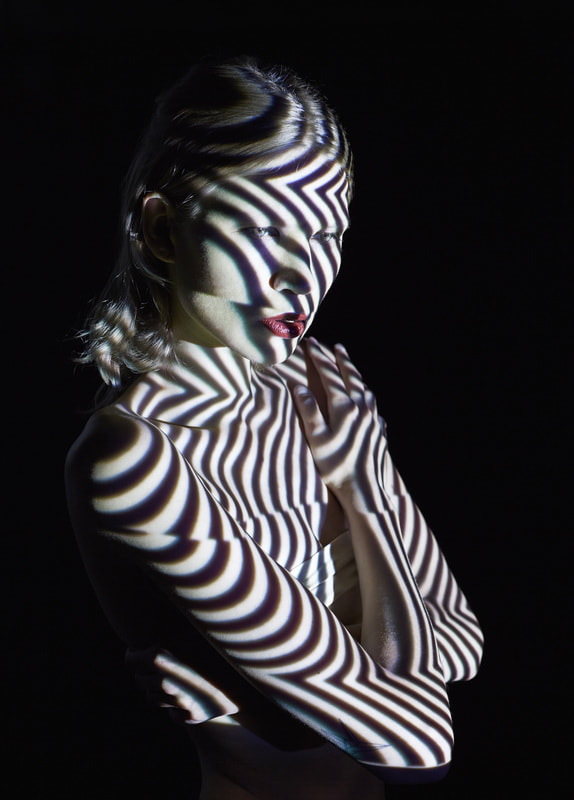
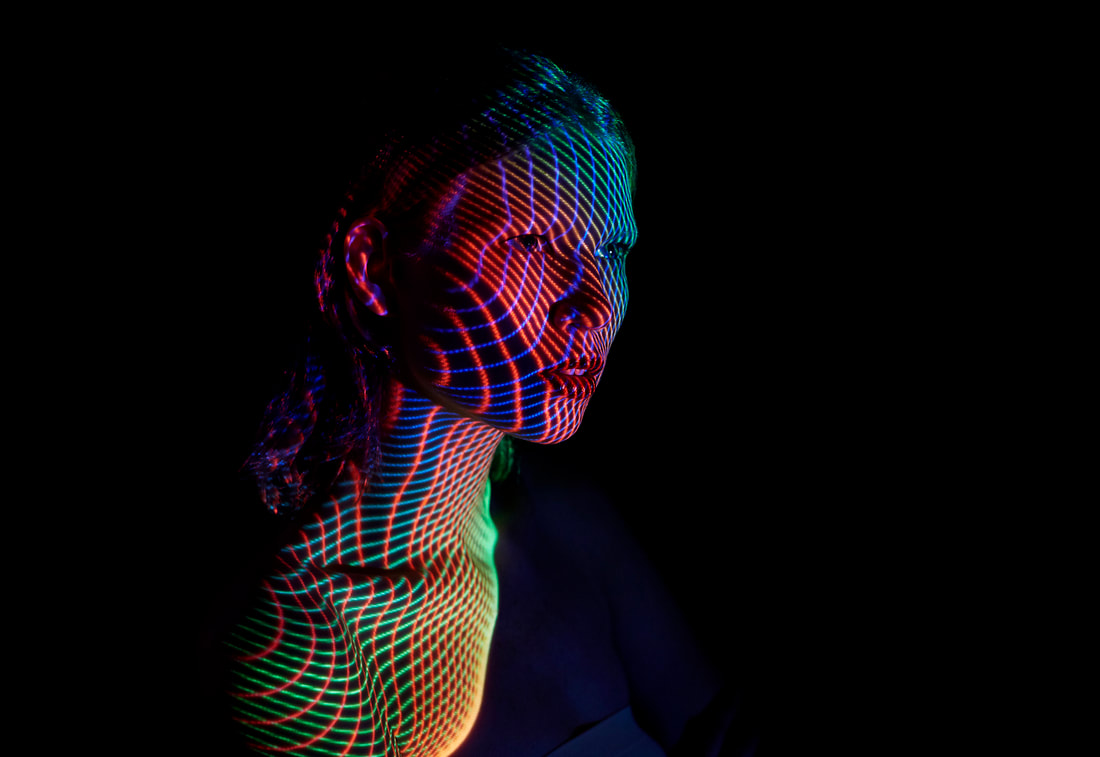
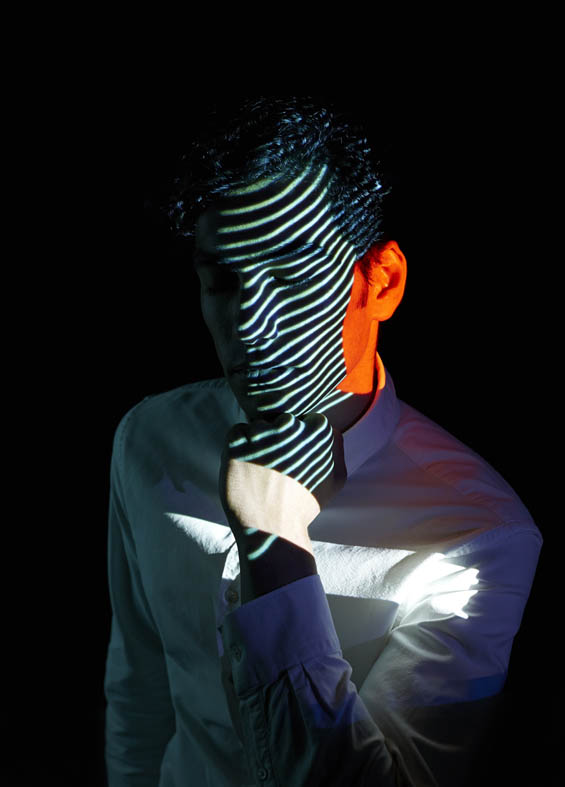
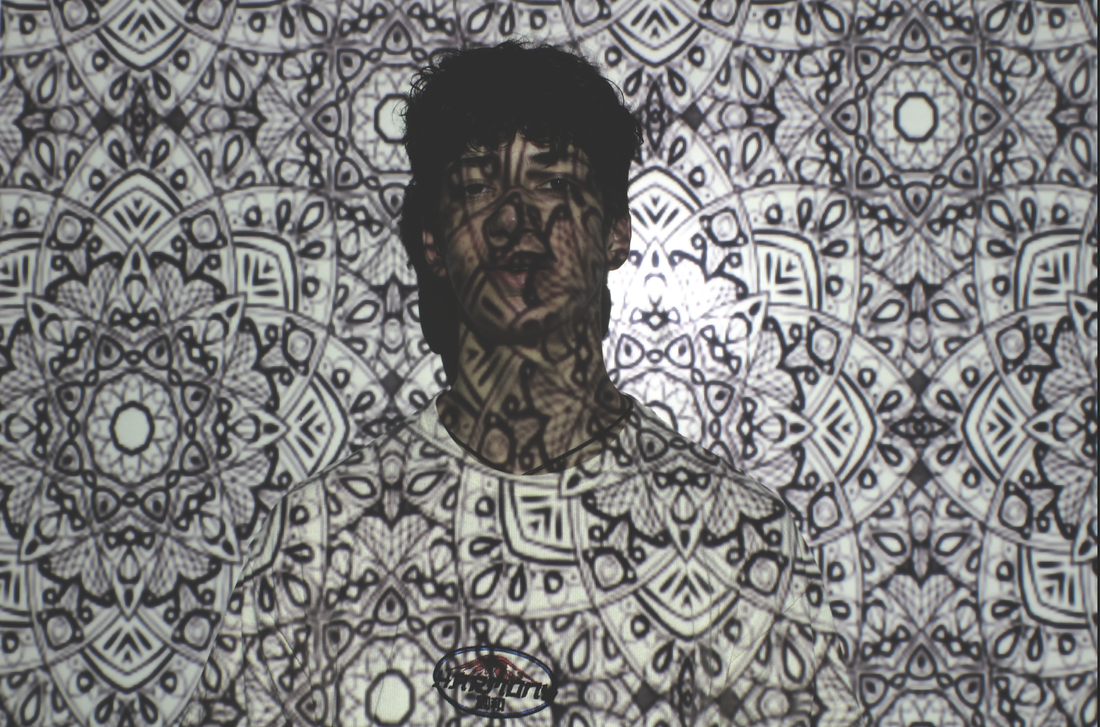
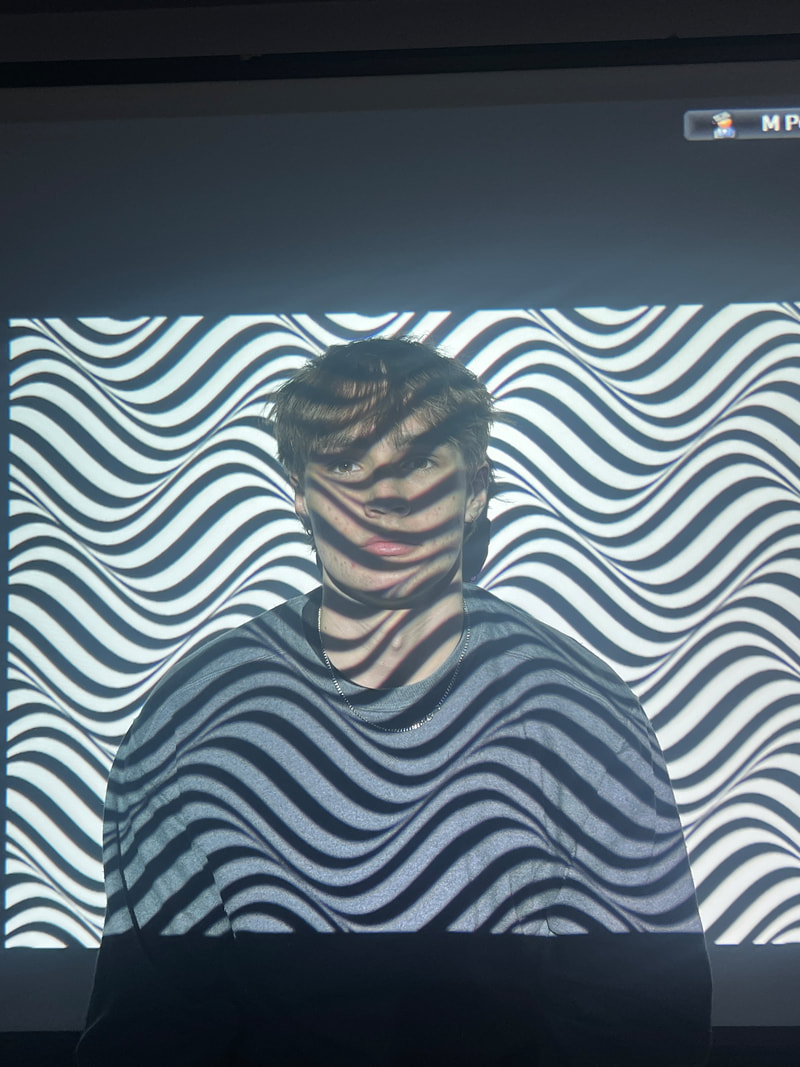
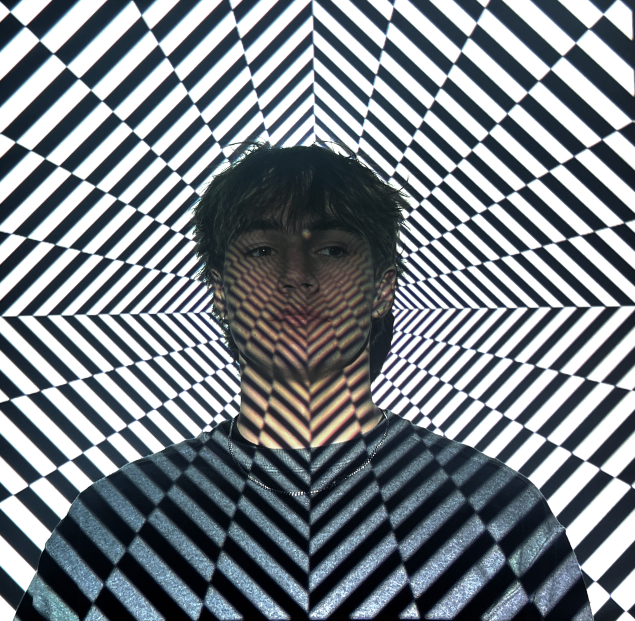
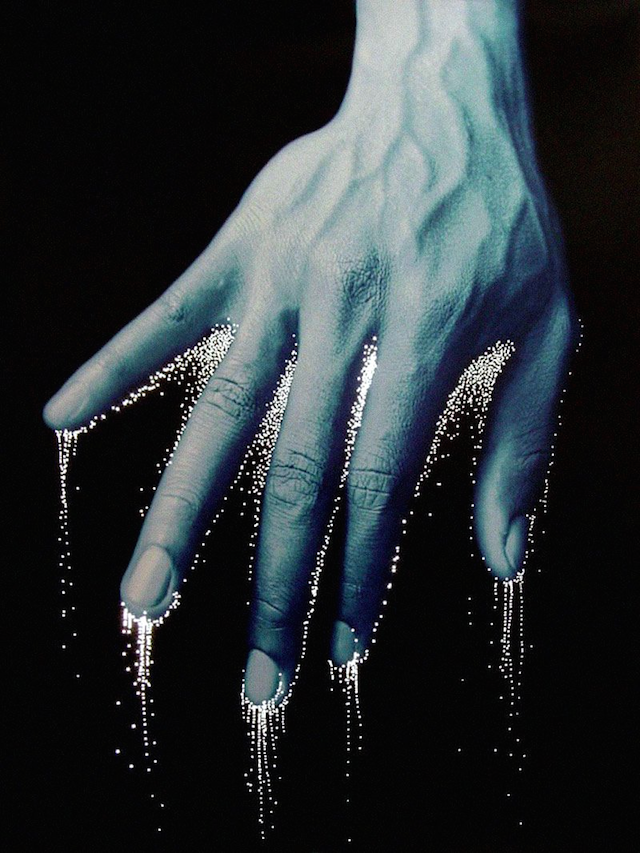
Mads perch is a London based photographer who does projection photography, this allows him to project different shapes and colours onto peoples faces/body's which allows to create this distorted type body with abnormal features and colours. What he also does is that he creates his own abstract patterns some with crazy colour's and others simple with black and white. As this is projection there are shadows parts that could link in with projection, like projecting shadows
|
|
|
My Response
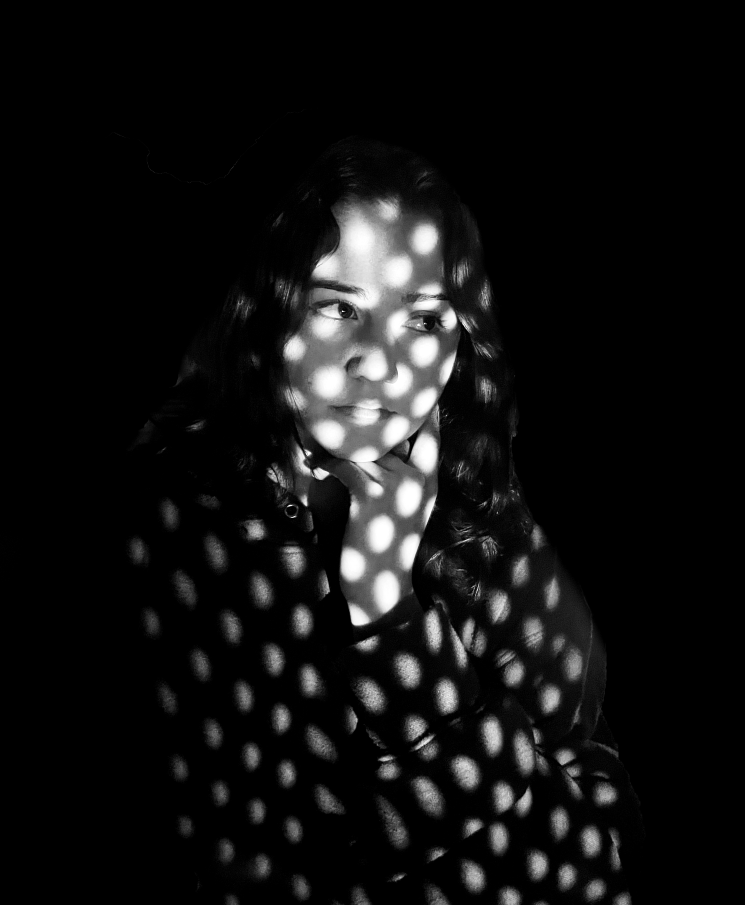
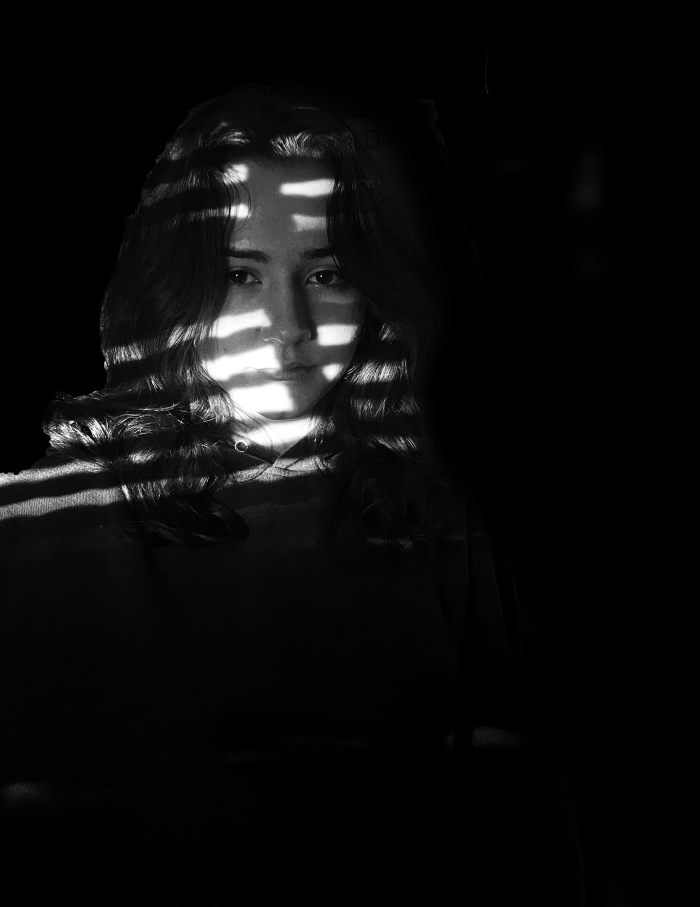
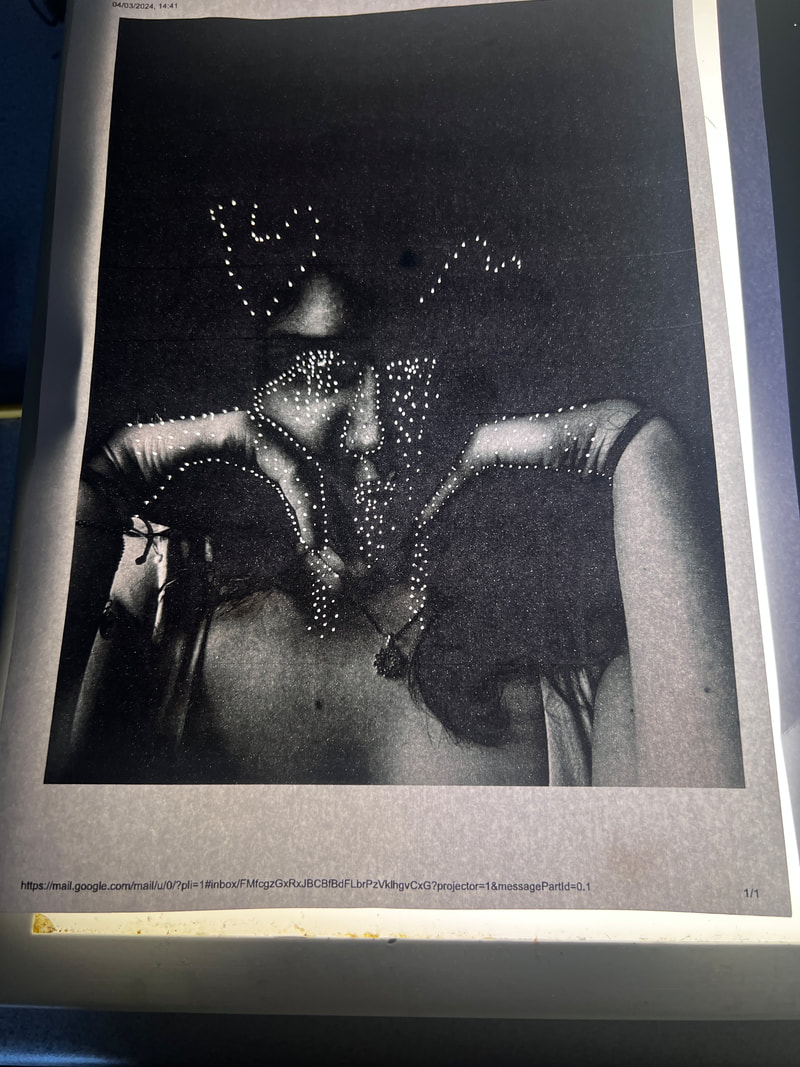
this is my response to Mads Perch, i had used colourful patterns as well as black and white patterns similar to Mads Perch. I had used a projector and set up my model in the middle of the screen, i took the photos with the patterns on their faces, I really like the fact how with the white shirt it blends in making it harder to see the difference.


Edit Response
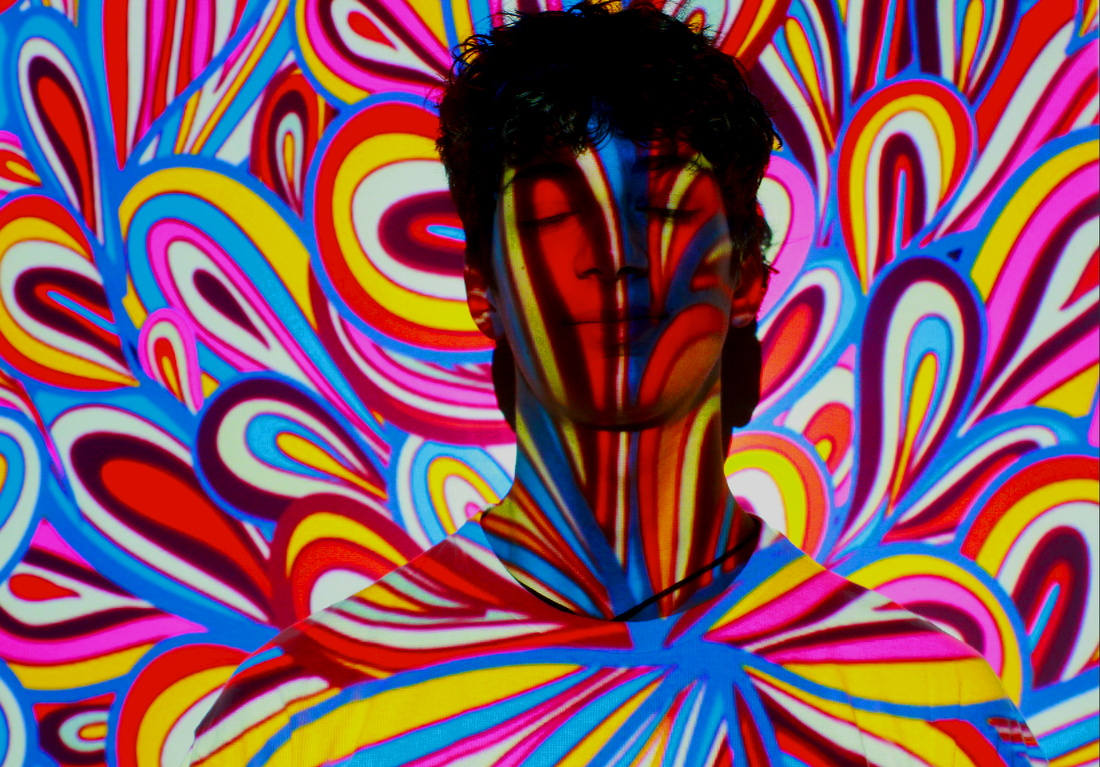
For my edit response to Mads Perch I wanted yo get the colour to really pop out meaning i would have to up the contrast and saturation to really get the colours to pop. I really like how they came out compared to the original photos as they look a lot more vibrant and they blend in more with body making it less visible.
|

|
Strand 2
uta barth
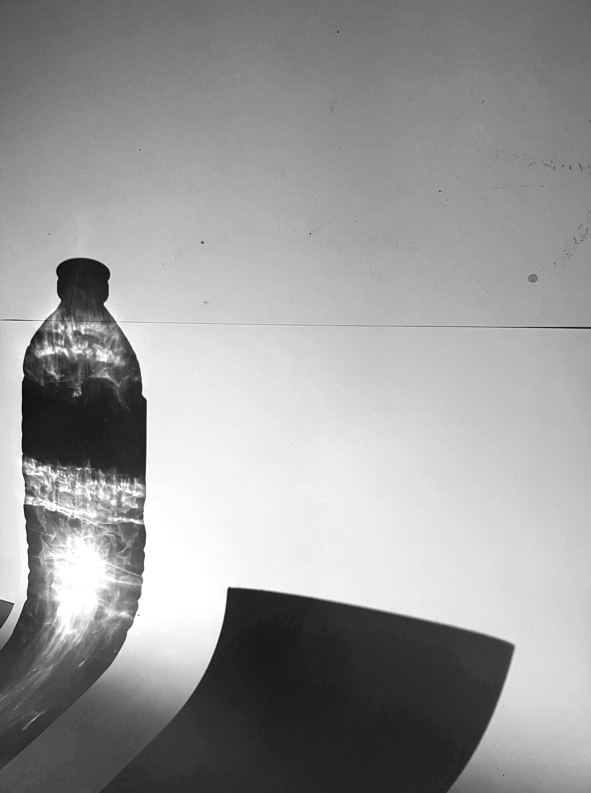
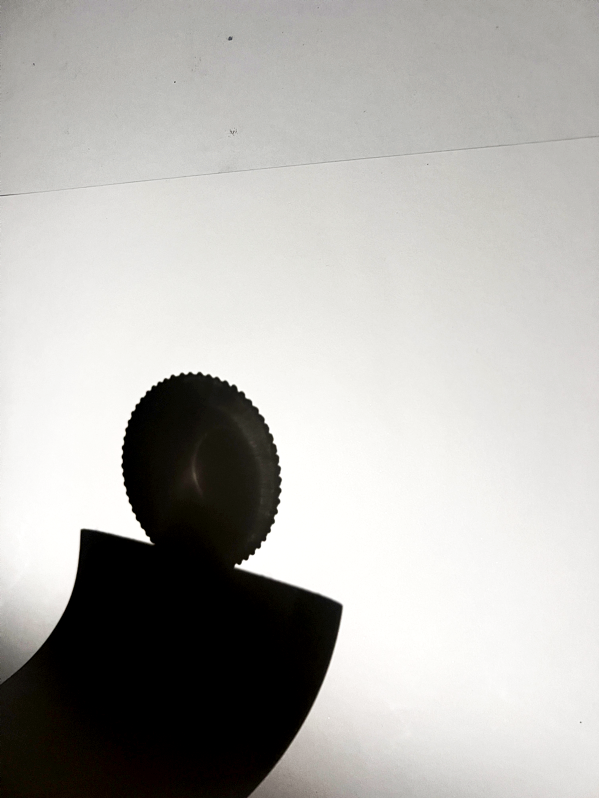
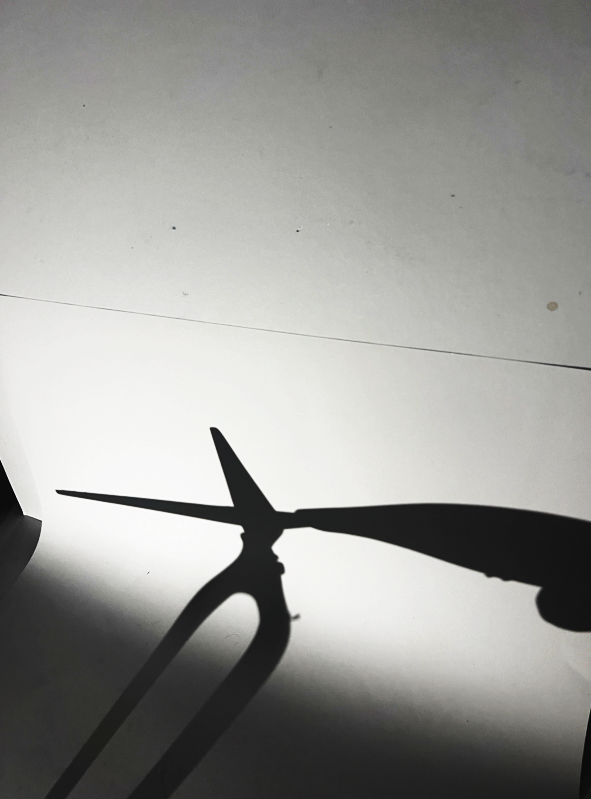
Uta Barth takes photos at a very sharp angle to get that very clean and sharp looking shadow of her objects, some of the stuff she photographs is not in the shot but the shadow is. She sets the camera up at an extreme angle to be able to capture these shadows and then further sharpens the shadow digitally which gives of this effect.
|
|

|
My Response
This is my response to Uta Barth and I kind of like and don't like how much photos came out, I don't like how they came out because I feel like they are not as sharp and clean and they also don't really have a structure to build on. But I do like how some of they came out as they kind off had a structure to them along with some nice sharp shadows.


Edits
|
|
WWW: Some of the photos came out good with some really nice edges and points that are very sharp which is what i was aminig for and wanted to get.
EBI: Use a stronger light source for sharper edges and a bigger viraiety of objects along with trying to keep the objects out of the photos to make them look better.
EBI: Use a stronger light source for sharper edges and a bigger viraiety of objects along with trying to keep the objects out of the photos to make them look better.
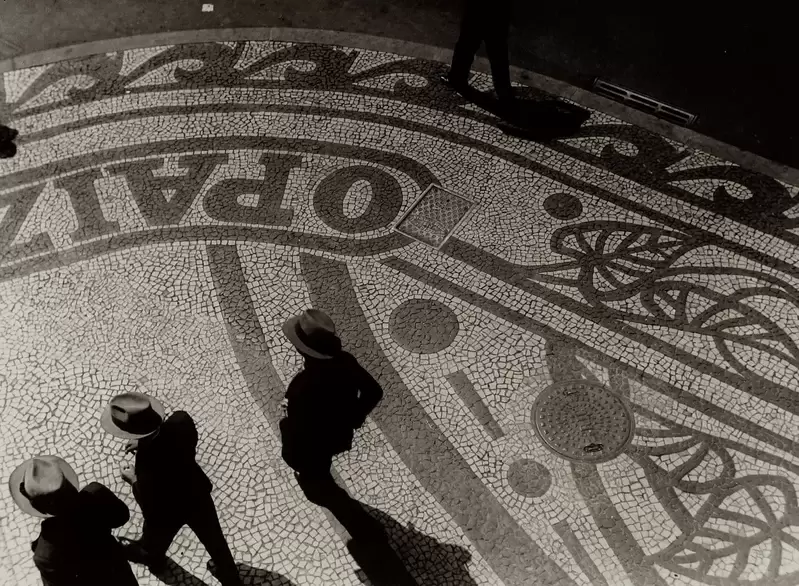
Strand 3
Martin Munkácsi
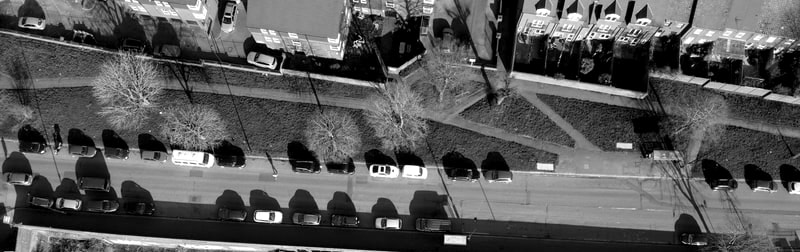
Martin Munkácsi takes photos from a higher angle than usual so that he can capture the long extended shadow that is behind the person. He is always on an elevated surface so that when he takes the photos his camera is always looking down onto the person and onto the shadow, he then darkens the shadow and all the dark colours digitally to create this white and black shadow photo.
|
|
|
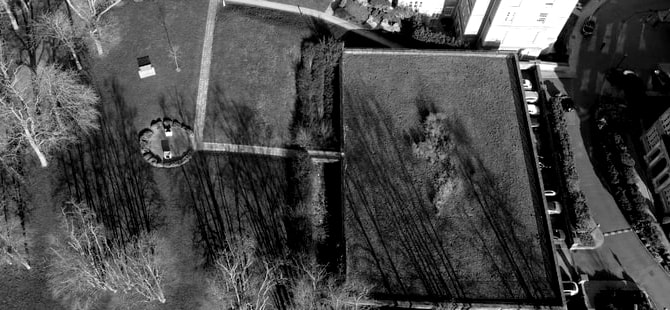
My Response
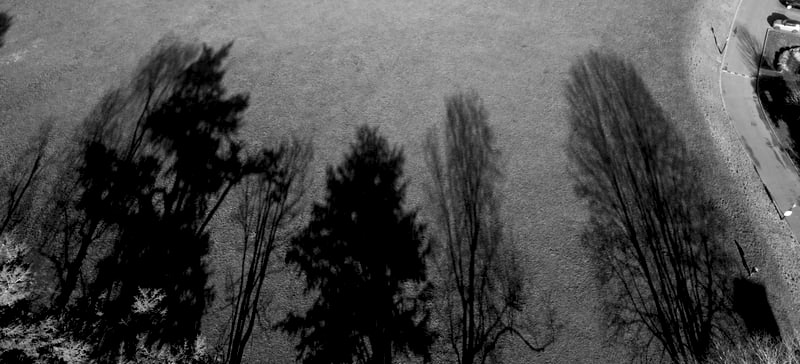
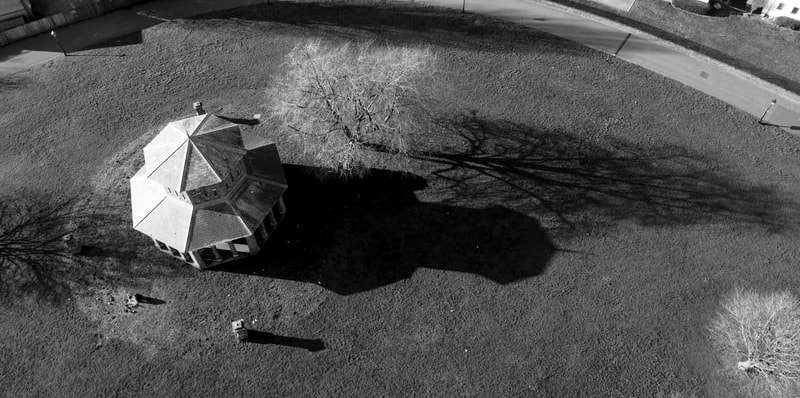
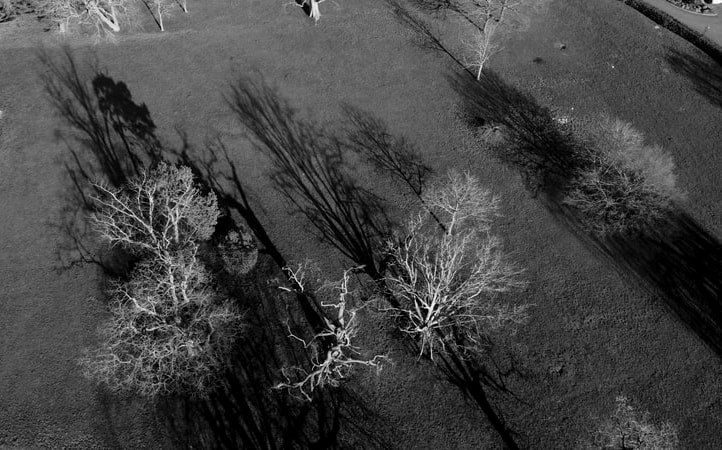
This is my response to Martin Munkácsi and i really like how my photos came out as i got some really nice shadows from some of the objects, Instead of doing people i decided to do objects and i had used my drone to be able to get these birds eye view shots, I feel like nature worked the best due to the fact that the trees don't have any leaf's its gives them a more abstract look in the shadow. I also really like how the shadows are elongated from the sun as it was more from the side then up above.


Edits
This is my edit response and i really like how them came out, I decided to crop out all the irrelevant things and i only focused on the shadow part's. This allows for the viewer to only focus on the main part of the photos with less distractions around the photo making it clear what is being photographed.
|
|
Development 1
I have decided to further develop the projection strand as Mads Perch as my main artist as I really like there work and I also really like how my work came out as well. I think I can get really creative with projection as I can use various styles and objects to try and make projection different. This time i had used black and white backgrounds instead of colourfull ones as i wanted to sharpen down the image. I had also used a few differnt angels that effect the way that you see the photo.


Edits
For the edit i decided to darken the black lines and whiten the white lines which allowed for the photograph to make it seem as if its more dominant and as if the model is just a transparent figure, i really like how they came out as the white and blacks are very strong just i feel like for some of the photos. For the other photos where i blacked out the background i quite like how they came out as there is a lot less to focus about and there is a main focus behind the photo.
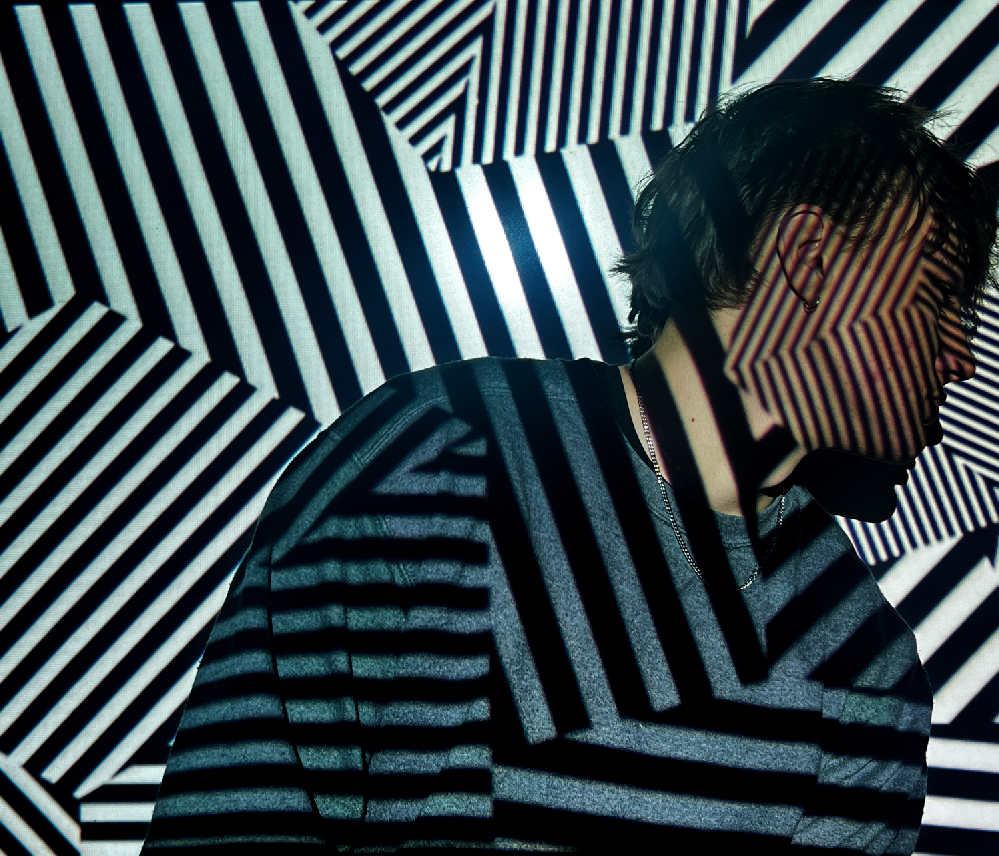
WWW: I really like how the white and black lines stick out and make the model seem transparent, i also really like how the black out photos focus on a much smaller part of the photo
EBI: If i took more photos from a different angel as every photo has the same angel and i should have changed it up a bit more, i also wanted to make the black lines a lot more sharper so that it looks better.
EBI: If i took more photos from a different angel as every photo has the same angel and i should have changed it up a bit more, i also wanted to make the black lines a lot more sharper so that it looks better.
Development 2
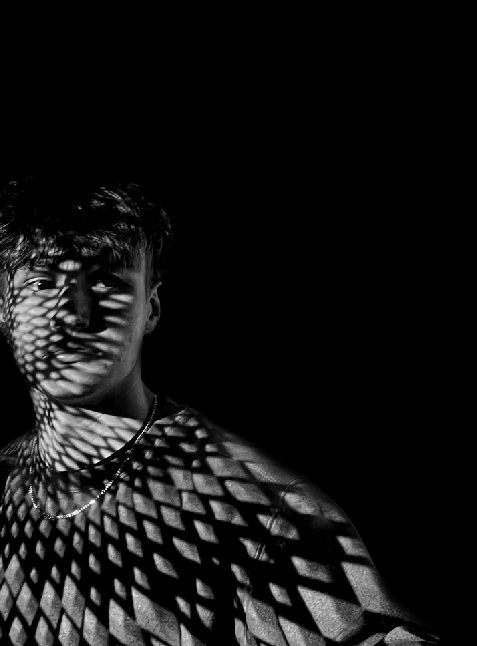
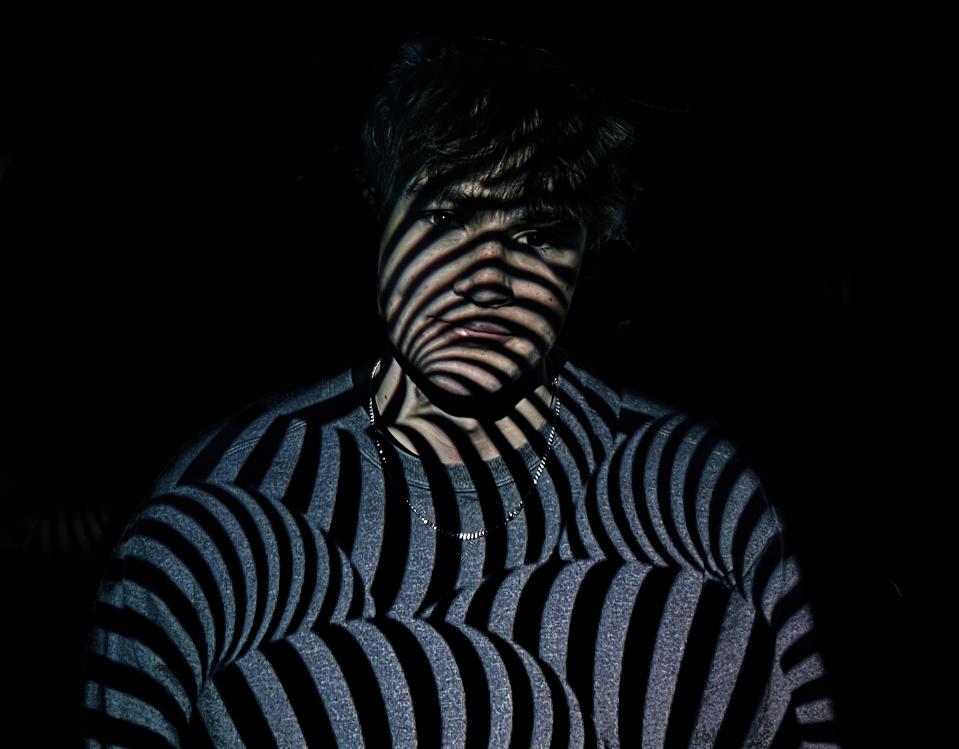
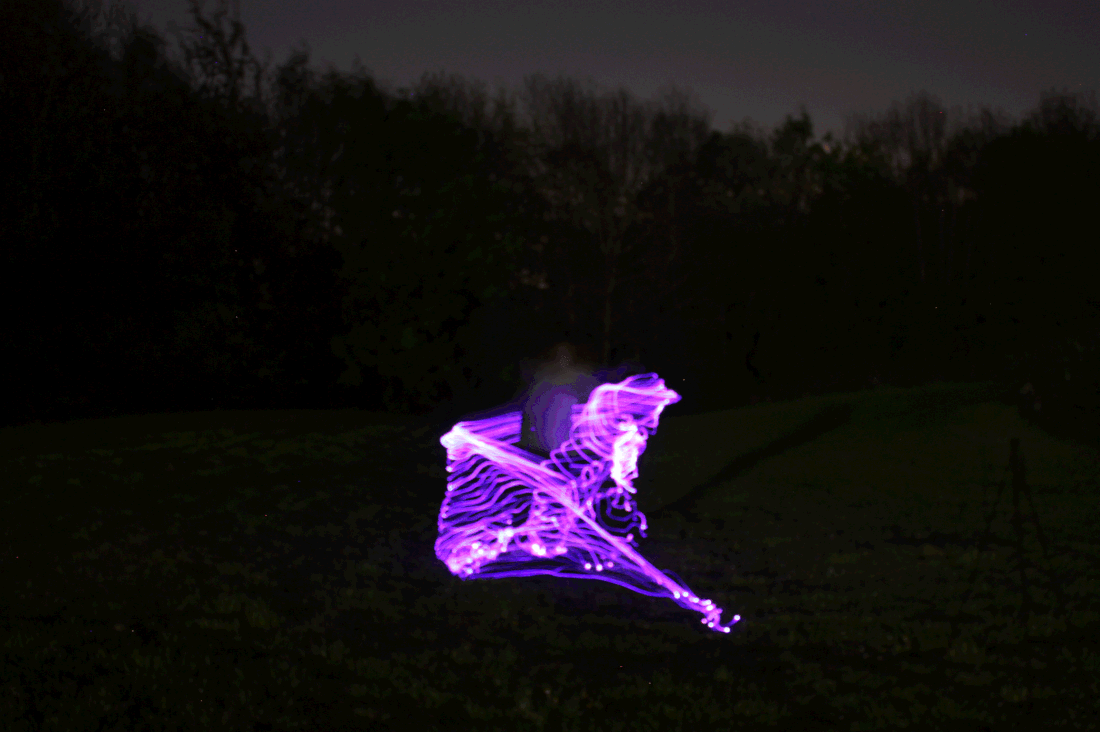
For my next development i will be doing shadow projection, i will take different objects and shine a light through them so that it projects the objects shadows on the model face, i will experiment with different lights and objects to see which will work out the best for me. I had used different house hold pbjects to create the shadows along with a light to project the shadows.
These are the photos that i took with different house hold objects and projected their shadow with a light, i had used a collider a cheese grater as well as a wine glass and a small basket. i Really like how these photos came out as you can see the clear lines and holes that have been created by the projection.


WWW: i like how the photos came out and how clear the lines of the different objects came out.
EBI: Some of the photos don't look great as some of the object's where hard to set up and get it to work.
EBI: Some of the photos don't look great as some of the object's where hard to set up and get it to work.
Edits
These are the edits that i took for my development i really like how they came out as the shadows are clear and sharp it looks really clean. I played around with both keeping the background and blacking it out and i really like both. The photos look quite interesting as i had used different objects, for the circles i had used a colander for the lines i used a cheese grater and i had also used a plant and a box.

|


|
Development 3
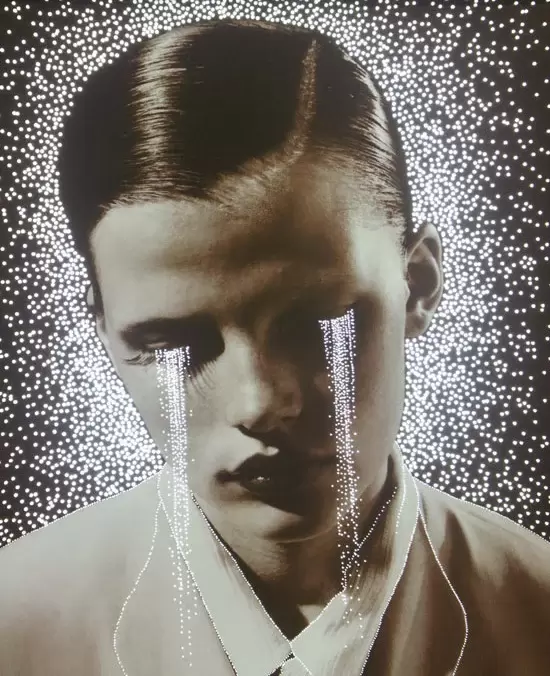
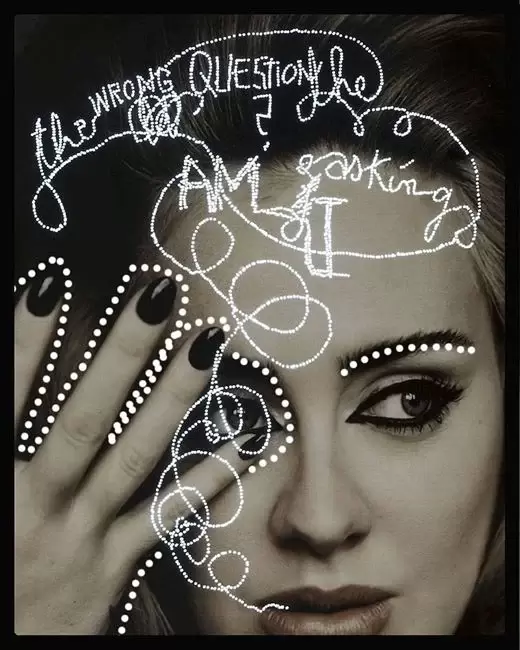
Daniele Buetti
For my next development I'm going to start looking at the work of daniele buetti, his work is very interesting as he would take a series of portraits and then poke holes in the photo to make it look like people are crying or a message over their portrait etc. I really like the way his work comes out as then he puts those photos and puts them in a light box.
|
|
|
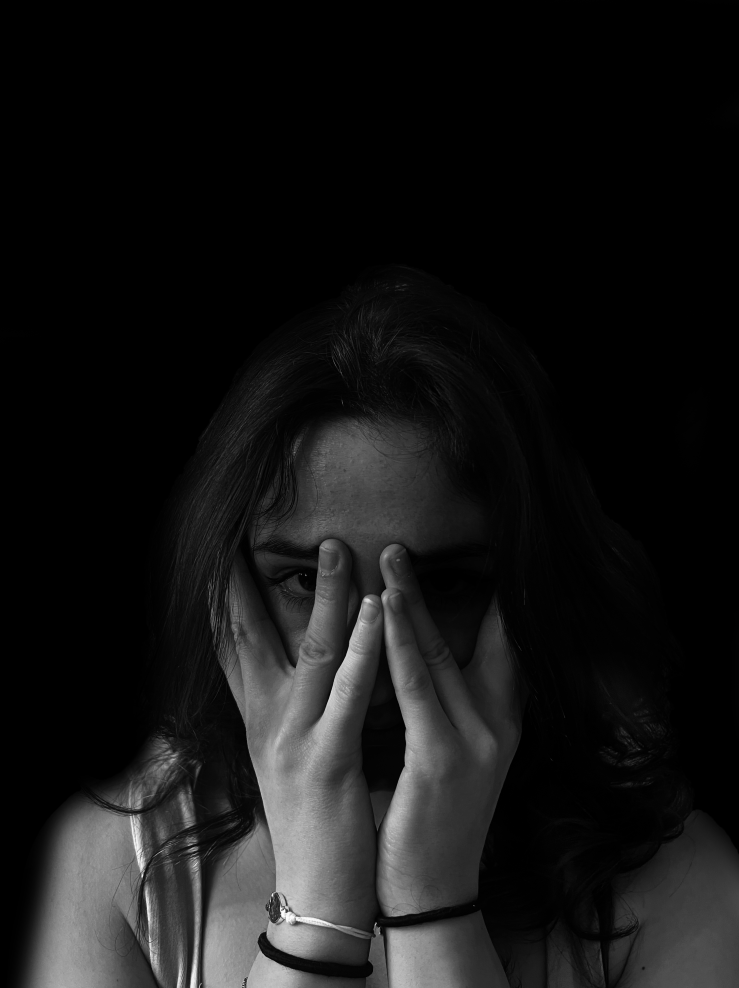
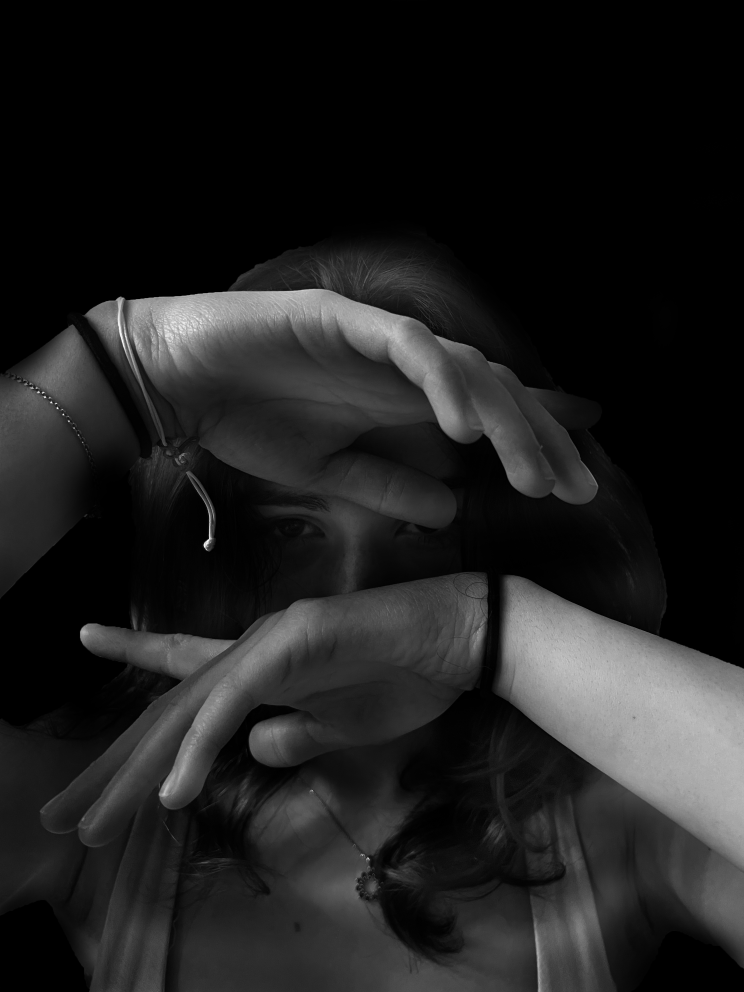
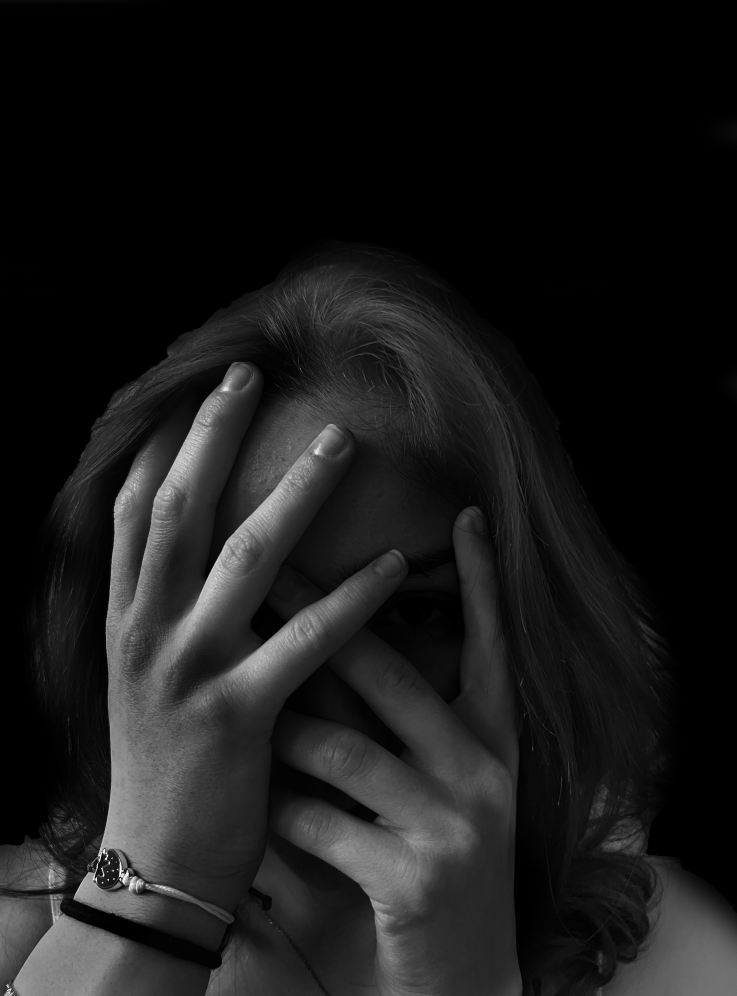
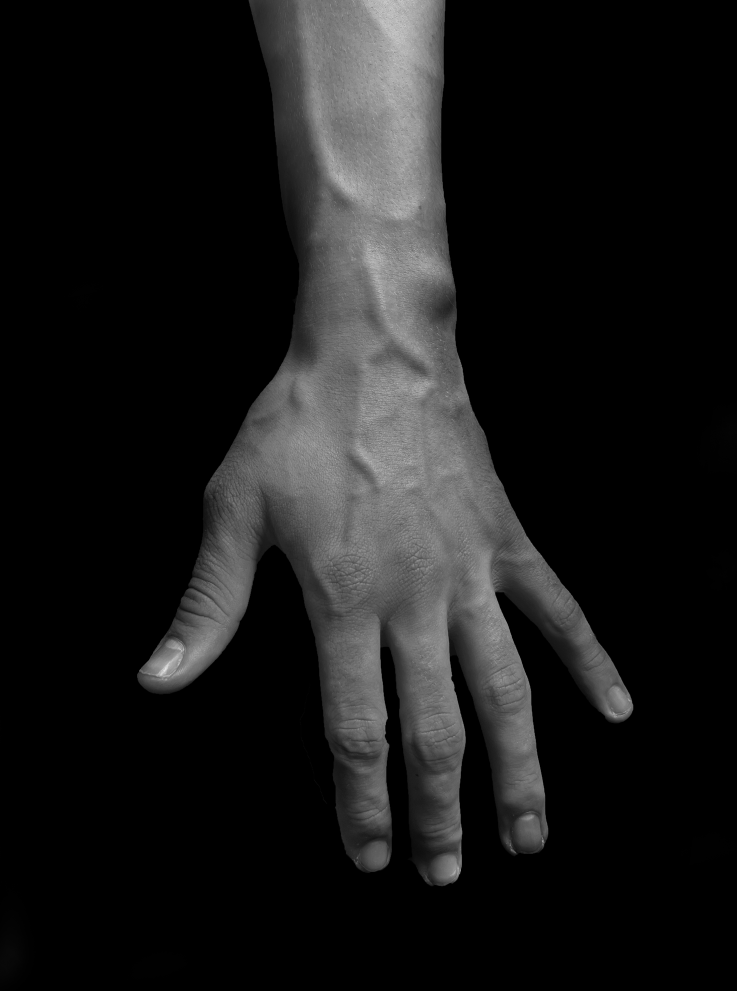
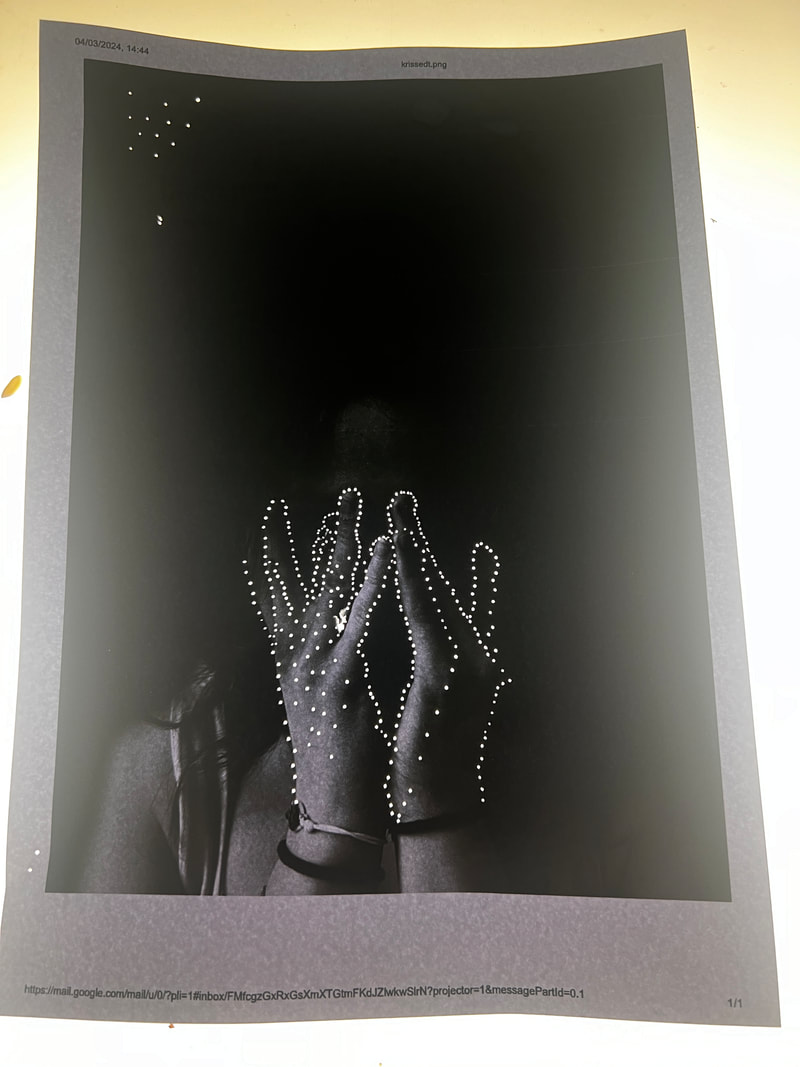
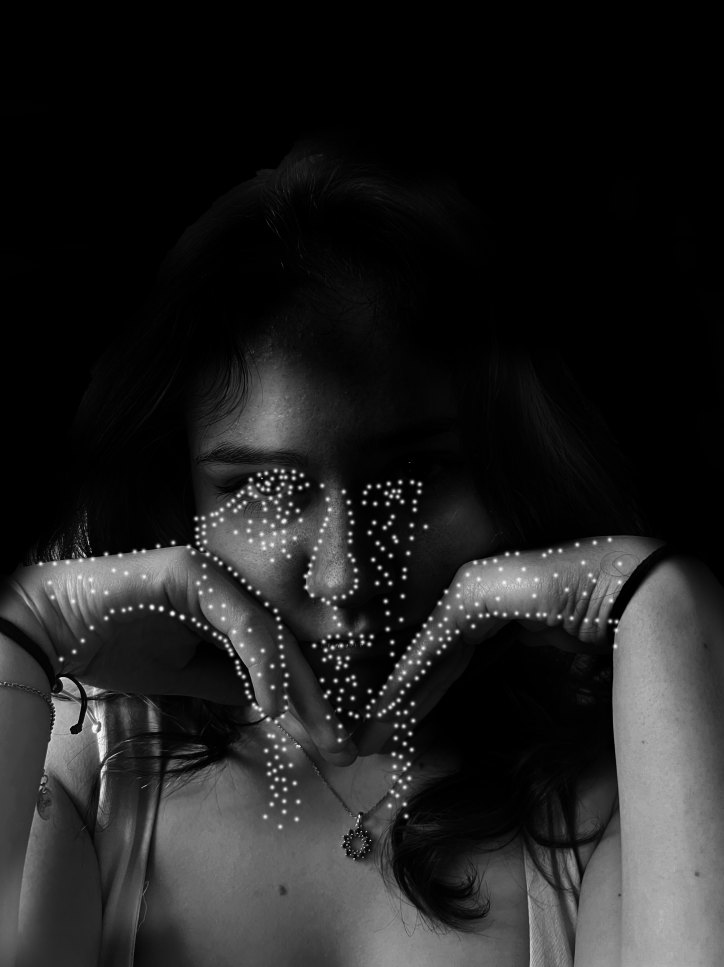
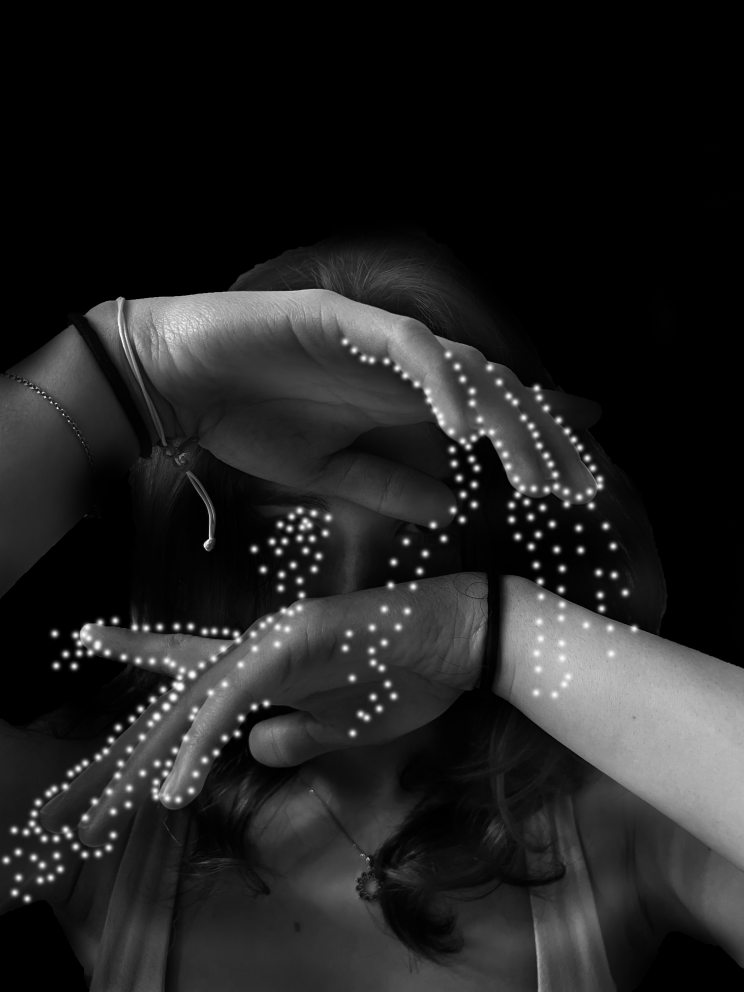
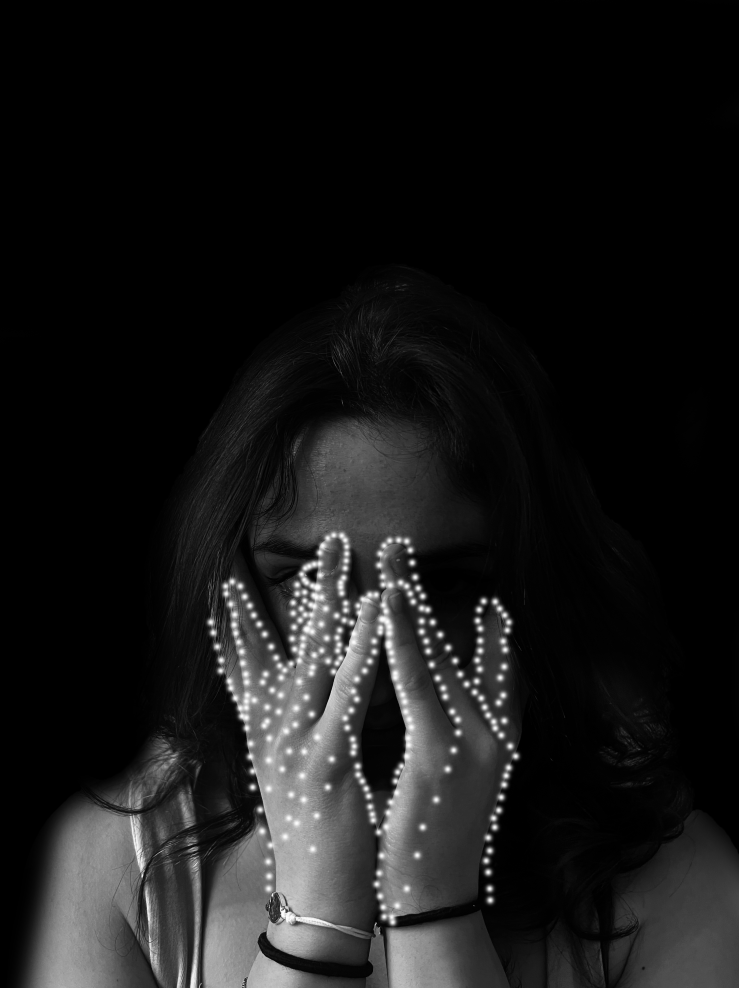
These are the photos i took for my response to Daniele Buetti i tried to do similar photos with the hands over the face along with the hand, i am next going to edit the photos by darkening the photo and blacking out the background so that the holes can be seen and then I'm going to start poking the holes.


Edits
These are the edited photos as i needed a black background so that the pin holes can be seen with the light box.
|
|
Pin Holes
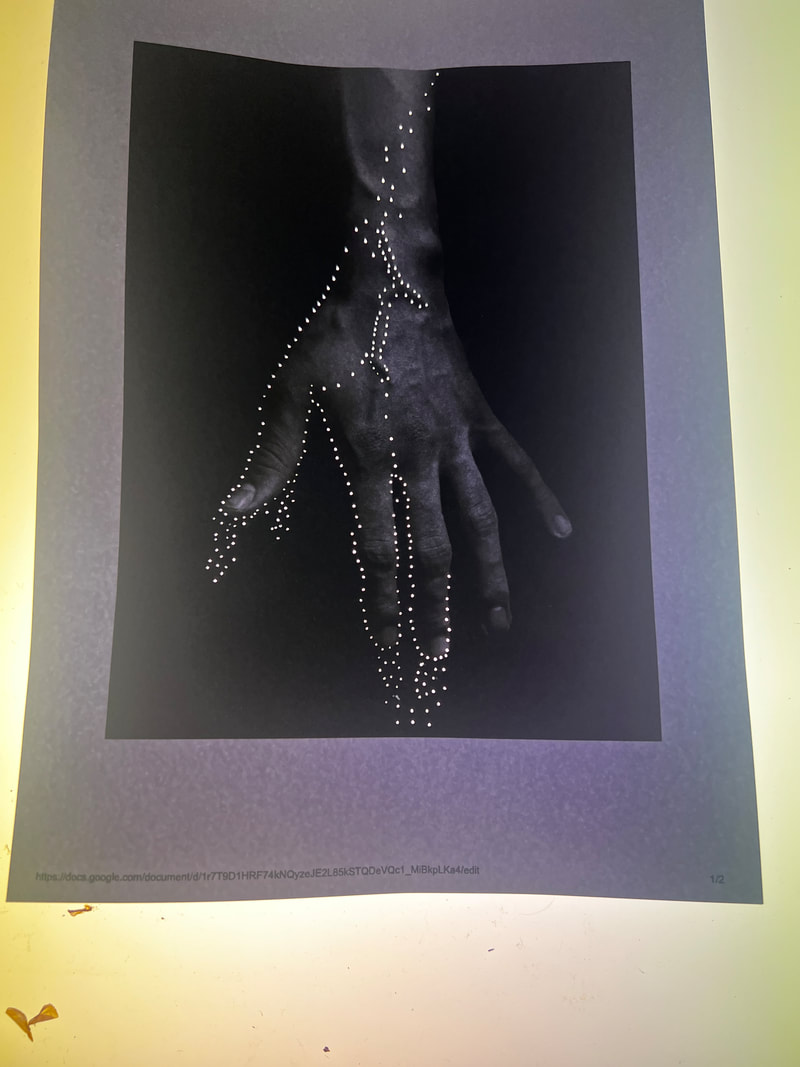
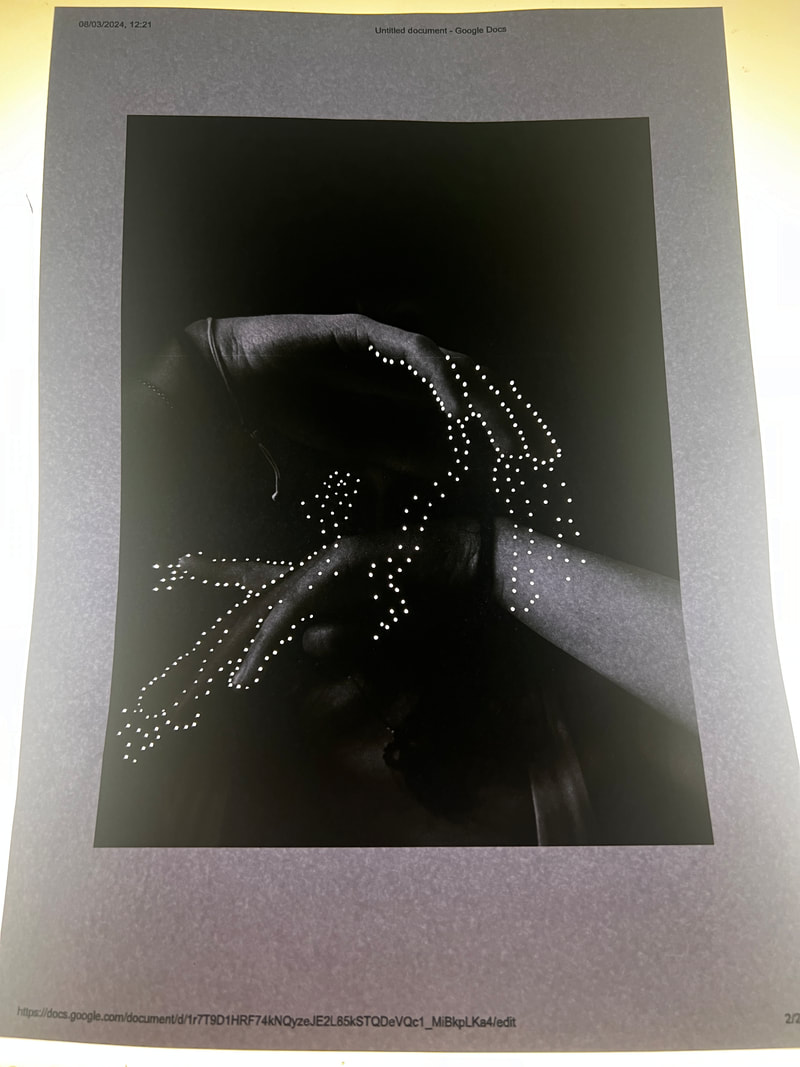
These are the photos with the pinholes and i feel like they look quite good but i feel like they don't look as clean.
|
|
|
|
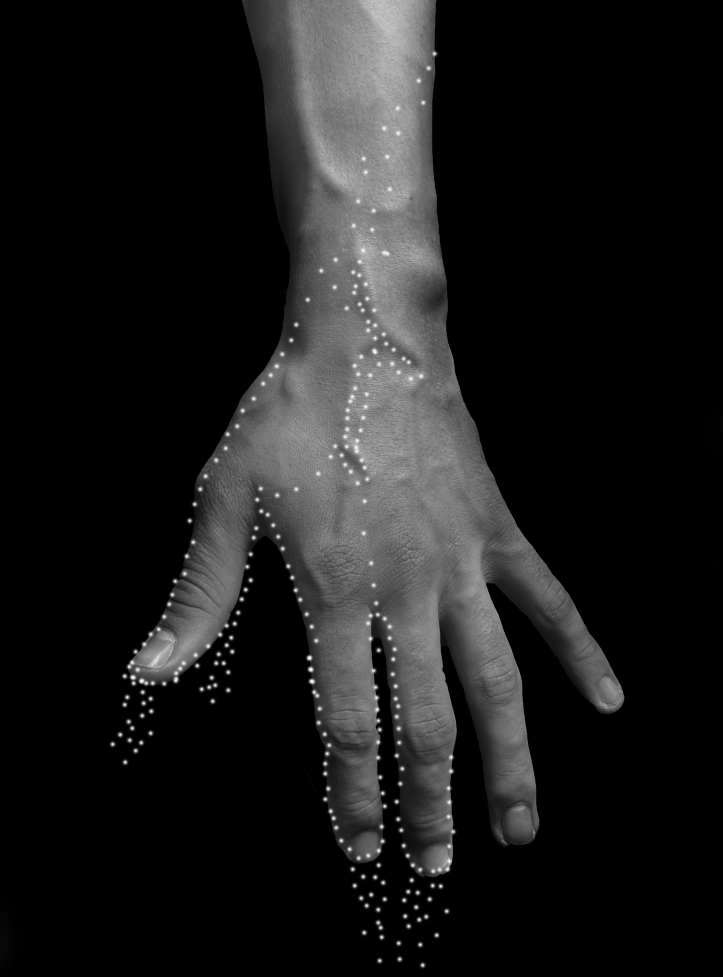
I took both of the photos into photoshop and i put the photo with the pinholes over the normal photo i turned down the opacity and then just traced over the pin holes with a small brush tool so that the photos are in better quality.
I created GIFS of the pinhole photos as i wanted to develop it a bit further as its something that you do not see often and i wanted to be a bit more creative and try something new especislly with the gif where the holes fall down like water droplets i feel. I really like how that came out, i also want to use more gifs in the futuer so having an example here will help me out.
I created GIFS of the pinhole photos as i wanted to develop it a bit further as its something that you do not see often and i wanted to be a bit more creative and try something new especislly with the gif where the holes fall down like water droplets i feel. I really like how that came out, i also want to use more gifs in the futuer so having an example here will help me out.

|

|

Development 4
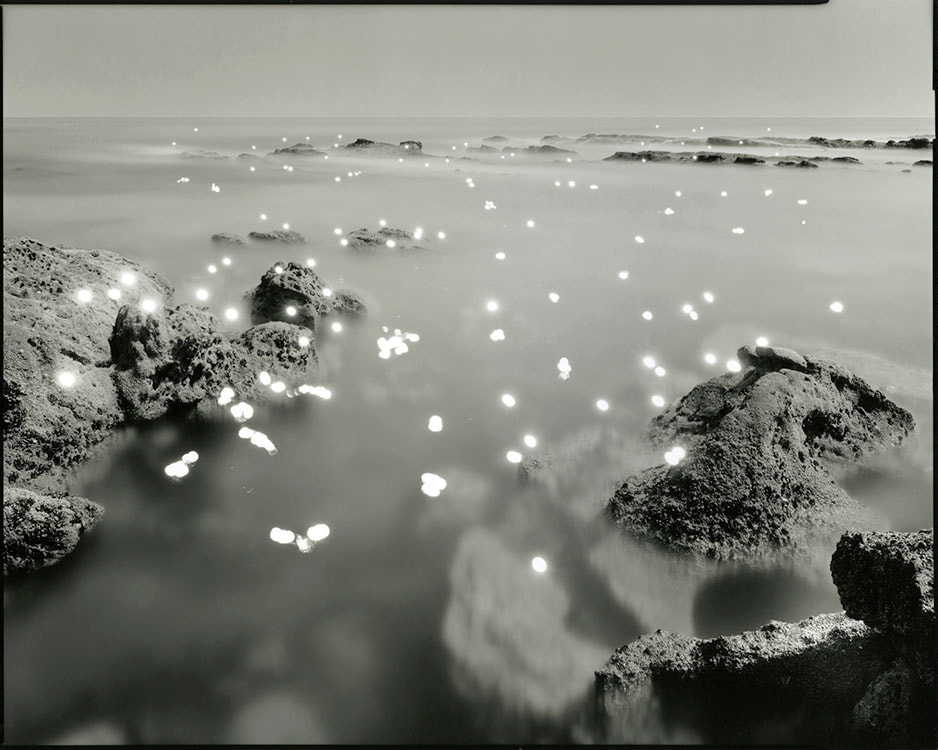
Tokihiro Satō

|
|
|
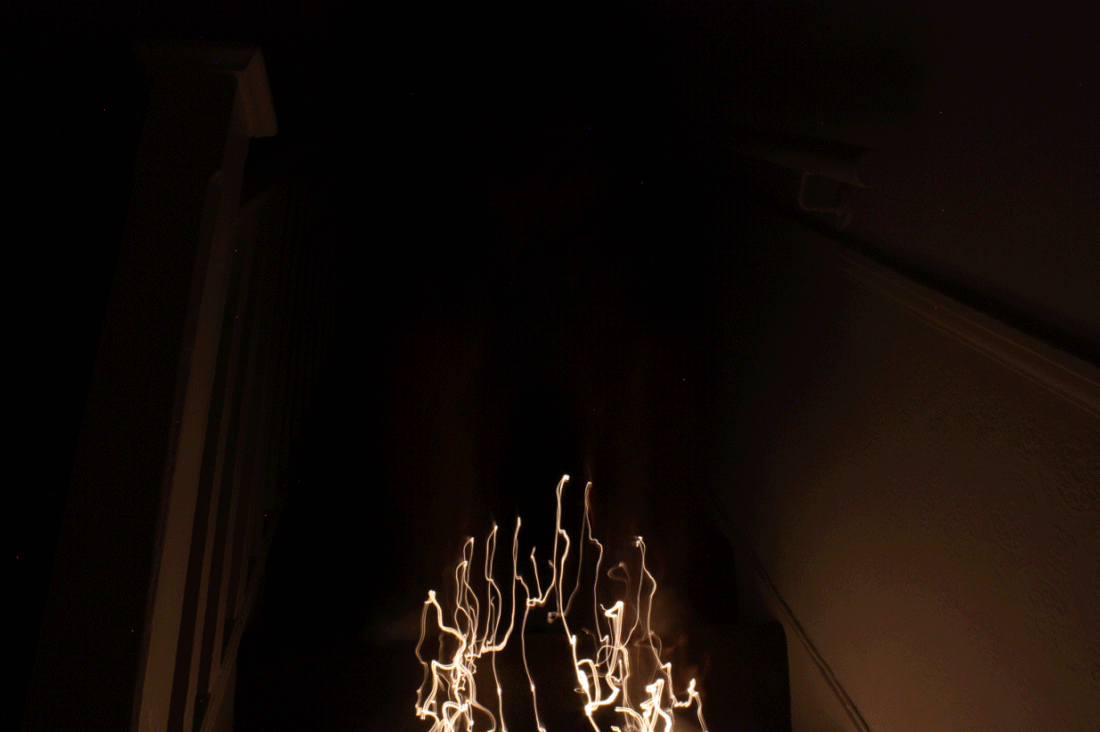
Sato Tokhiro was recognised for his playful interaction of light in his photo. Tokhiro used a long exposer of 5-10 minutes and used a light to make his photos light up in an unordinary way. He makes it seem as if the lights are floating in mid air and are in a very weird shape. Sato Tokhiro makes his photos stand out to me and they look really unnatural, these photos that Sato Tokhiro took are some of my favourite because of how they look with the background and the lighting. I wanted to move onto light photogarphy and light trails but i had to start off my light photography foundation somewhere and i decided to use Sato Tokhiro as this work is quite simialr to projection.
My Response


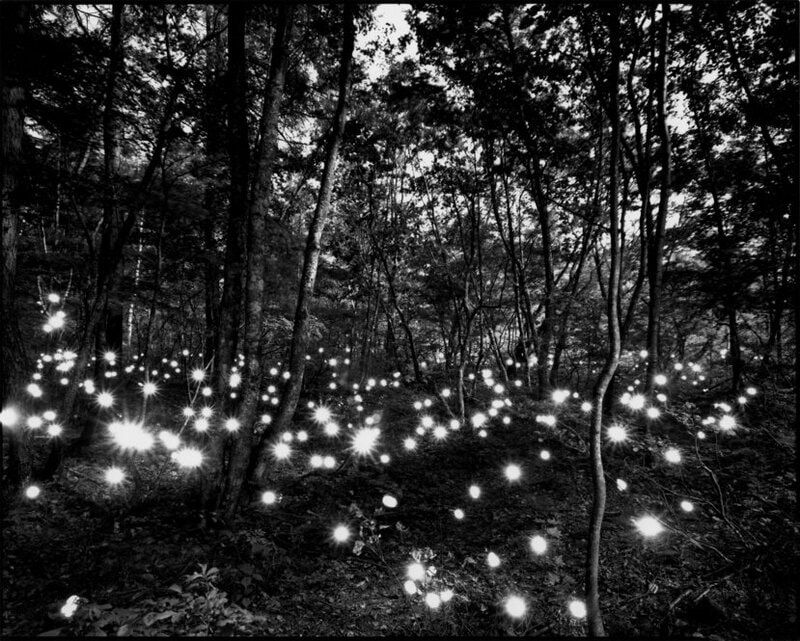
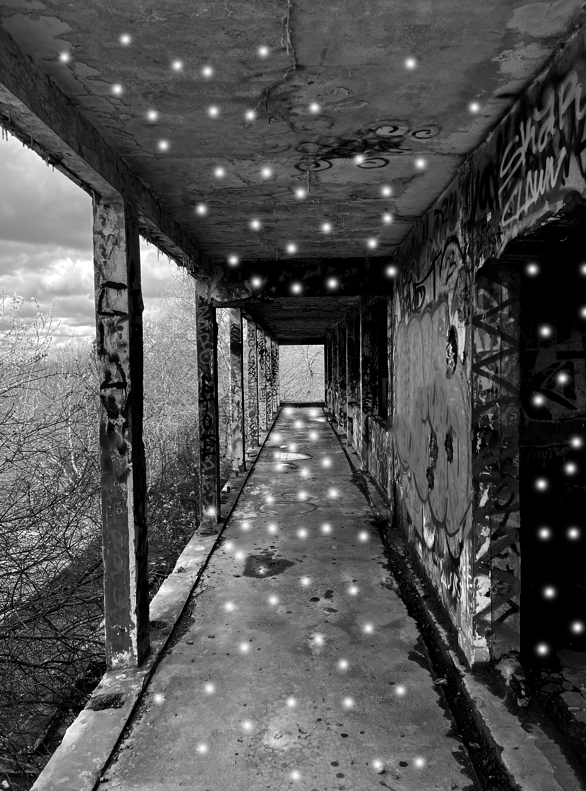
These are the photos that i took in my response to Sato Tokhiro i did the long exposer photos with about 20-30 seconds and i had used my phone flash light to create the dots, some of the photos came out really nice as they are not blurry and not overexposed but you can still see the background and the dots clearly.
Edits
|
|
WWW: The dots are spread out and they are not too bright and i really like how they came out, i really like how it makes it seem as if they are floating.
EBI:A better loaction and try to use more space and try to have longer exposer times so that i can have more dots along with more time to spread the dots out.
EBI:A better loaction and try to use more space and try to have longer exposer times so that i can have more dots along with more time to spread the dots out.
Development 5
|

|
|
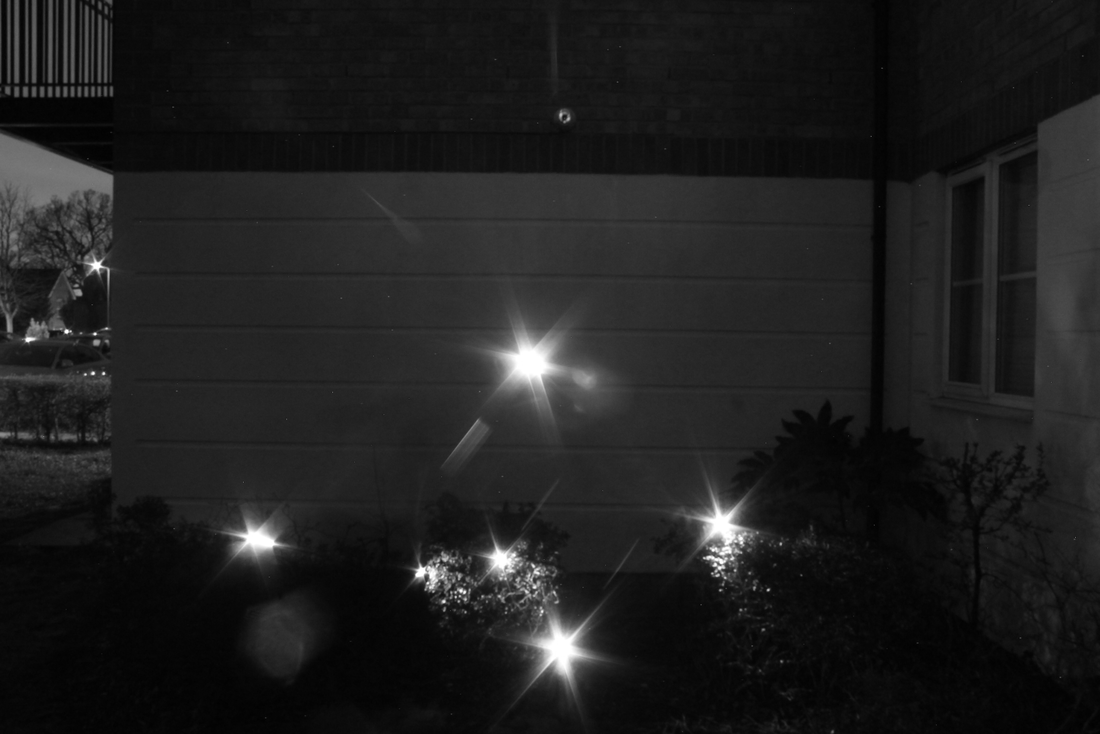
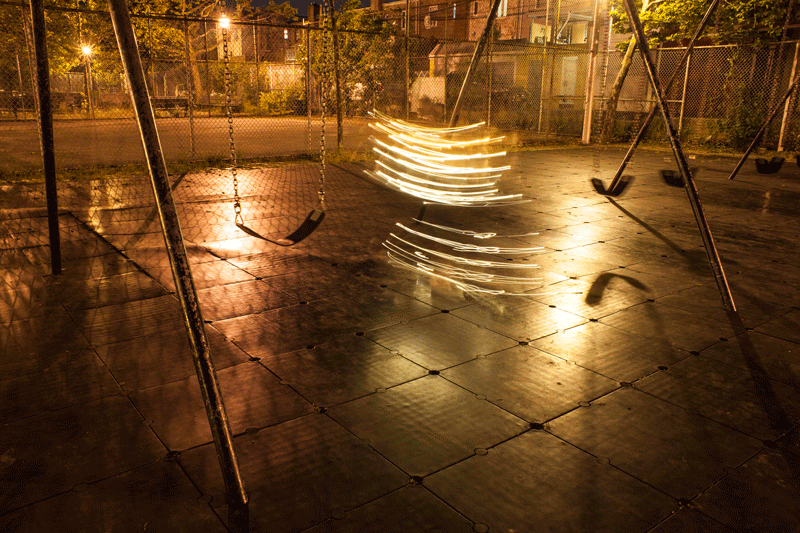
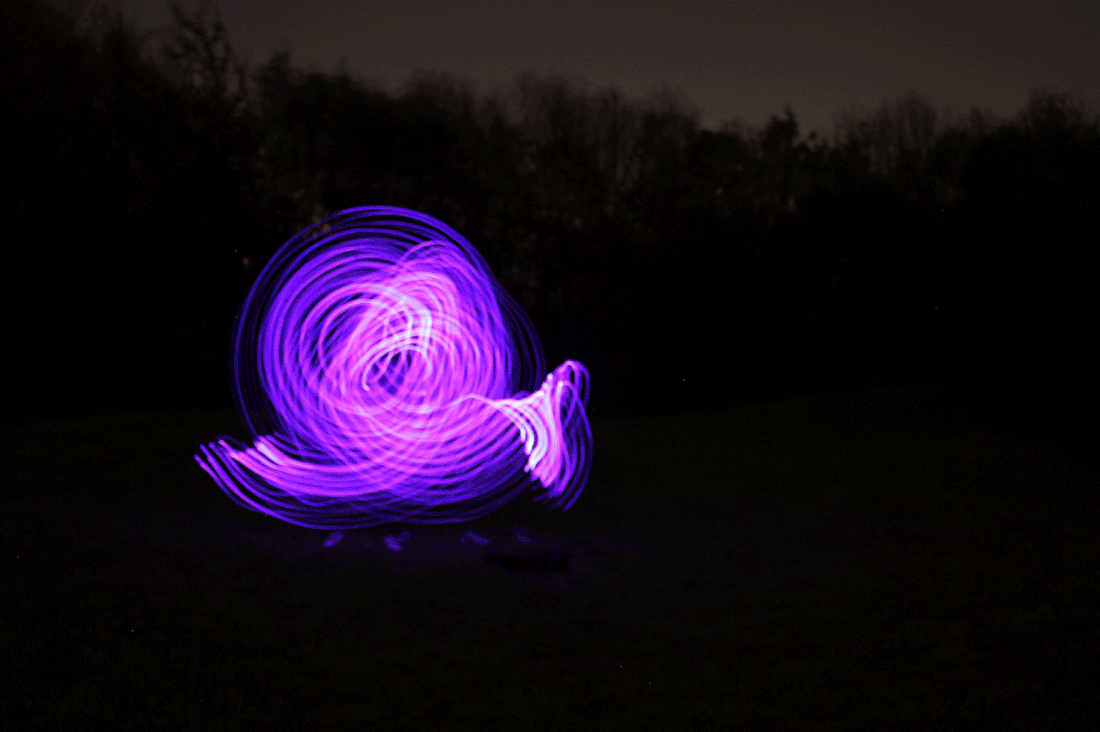
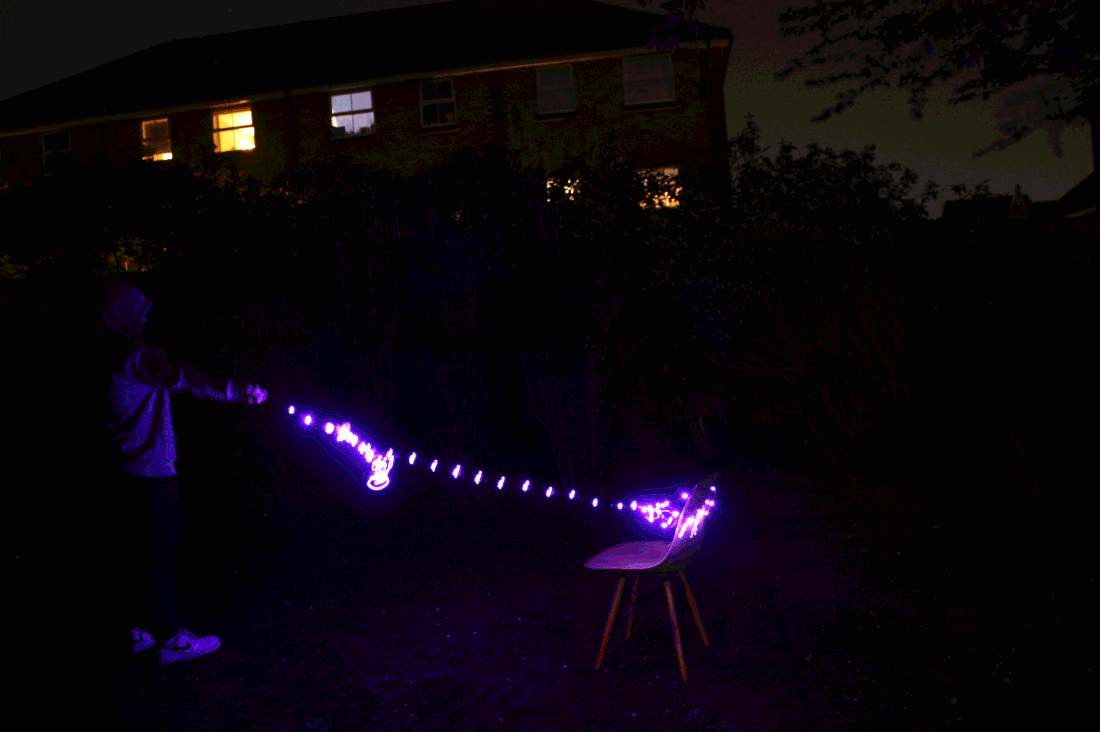
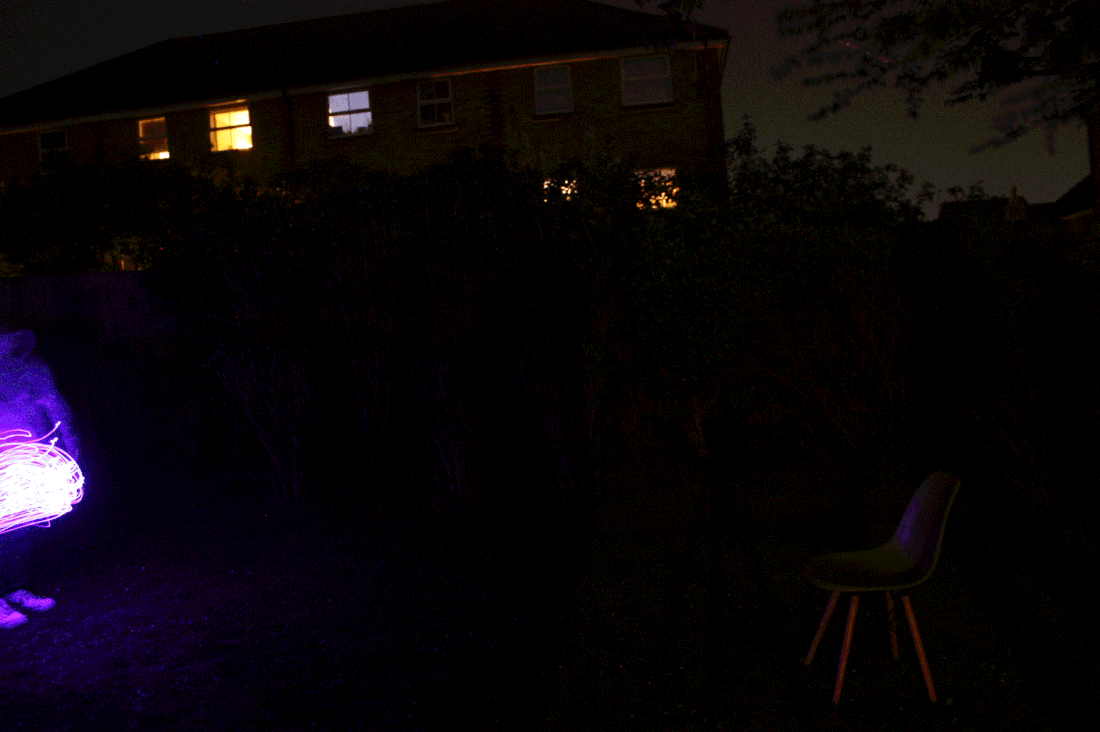
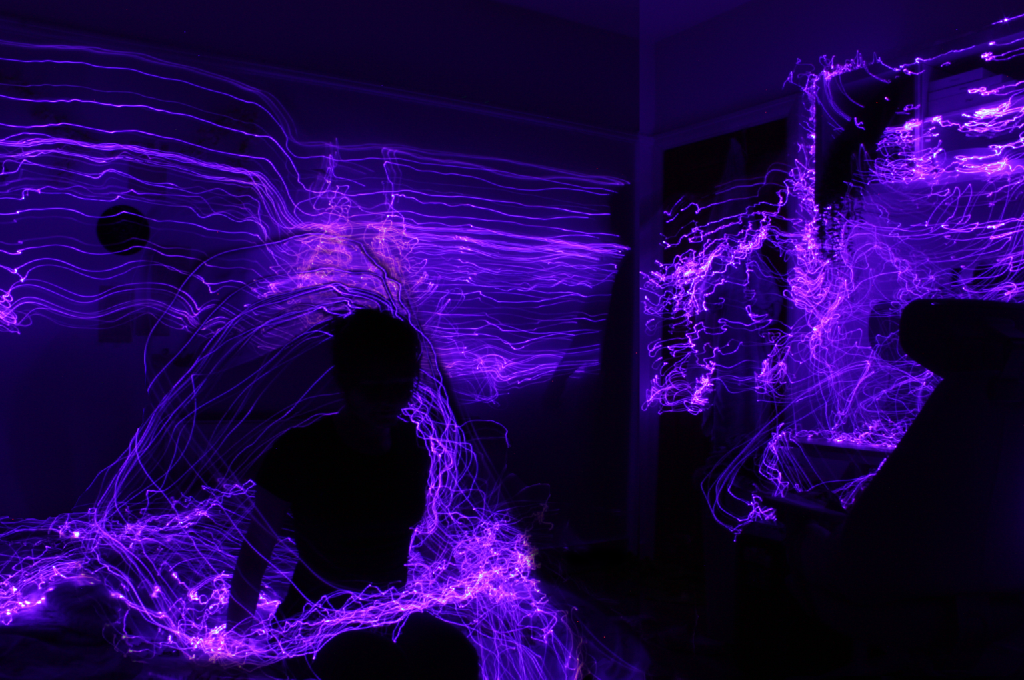
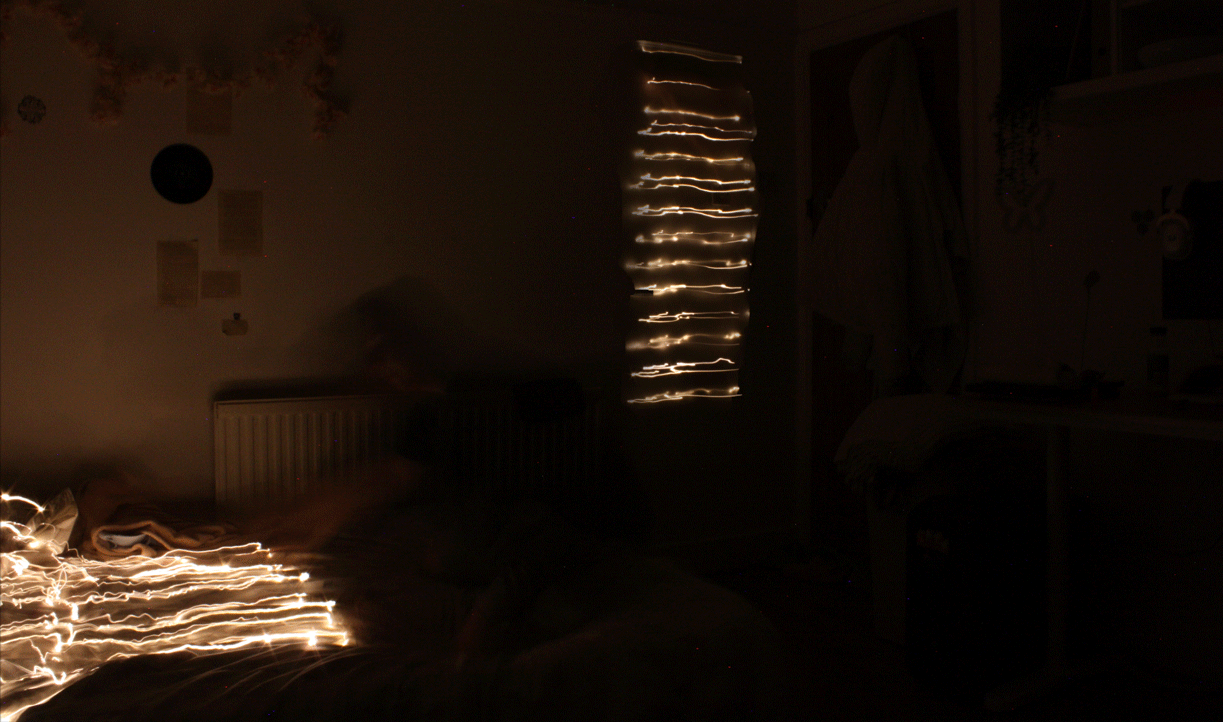
These are the photos that I took of my light trails in the dark room I was just experimenting and seeing what works and what does not work, i had also tried out making a gif where the light and the objects move and i really like how it came out. I had also done a few examples with people in case i also want to use people in this development.


GIF Edits
These are the Gifs that i made with the light photography, i used the light to move the objects trying to make it seem as if the light connects or wraps around the object and then drags it closer to the main source of the light.
|

|

Development 6
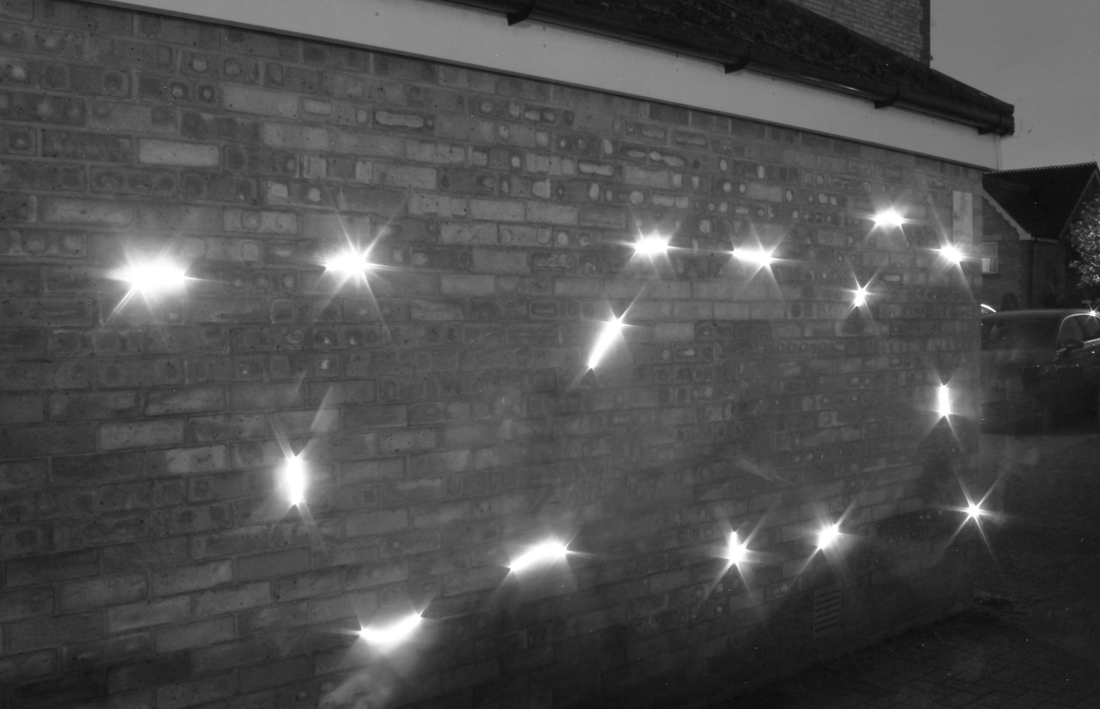
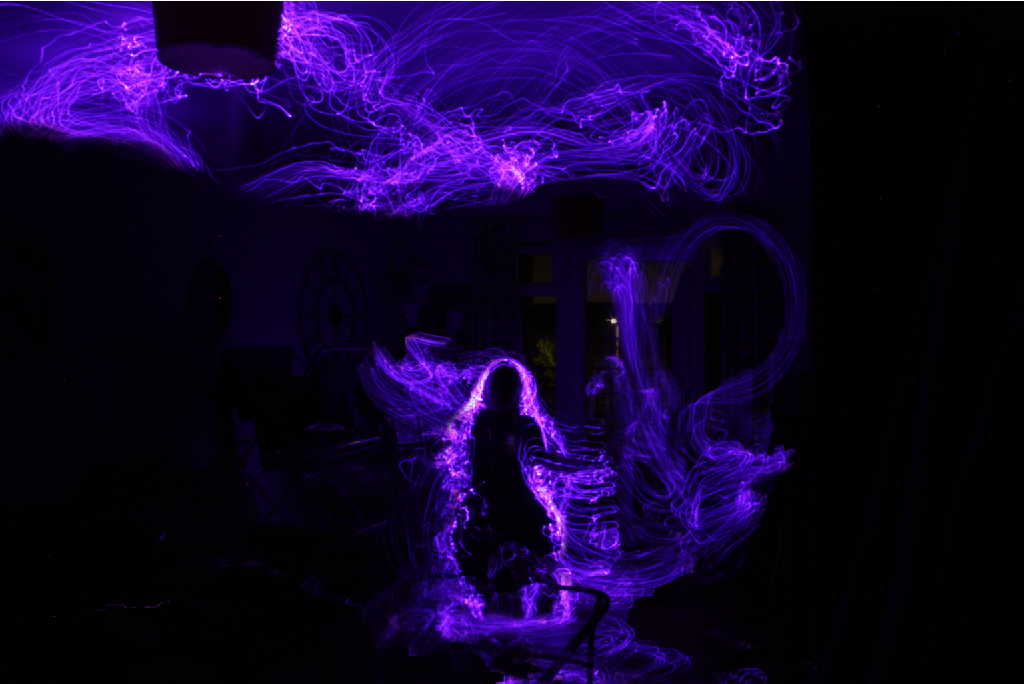
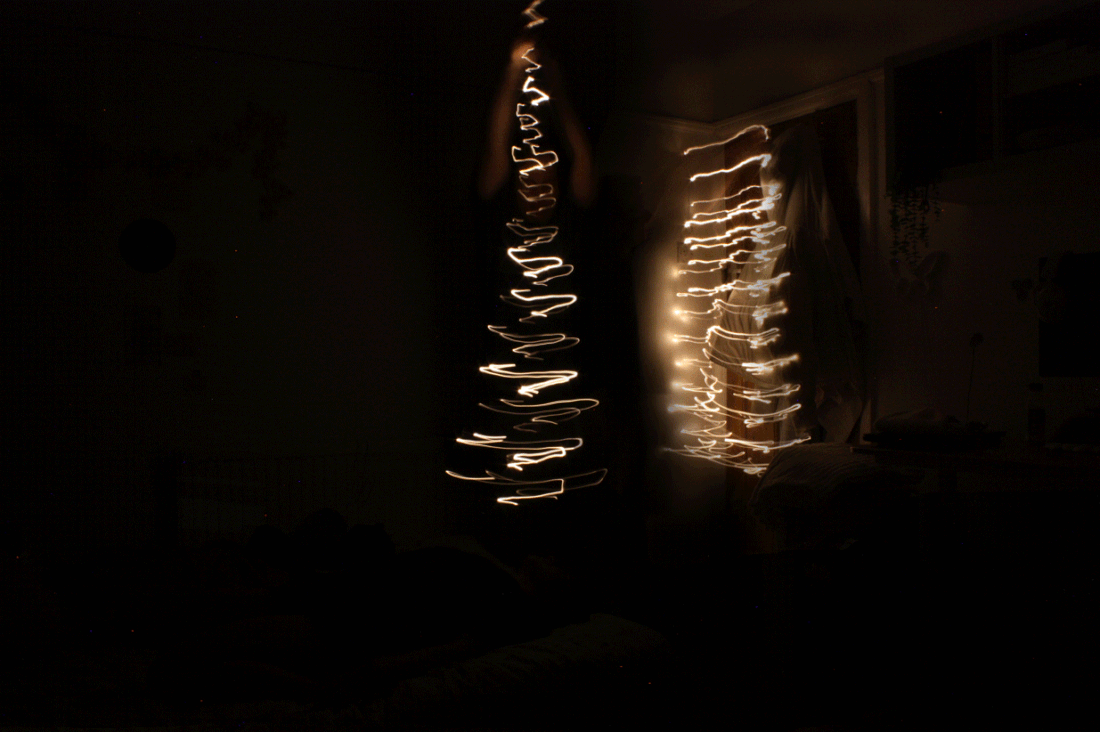
I have developed the movement of the light, i had used better coordination by setting up and knowing the exact place of start so that each further movement has the same past movement. This allowed for my photos to come out a lot better and a lot cleaner, i had also changed location so that i have a lot more space for the bigger movements. Once again i had used the fairy lights and had a set iso of 100-200 and and apatuer of F18 and and exposuer time of 10-20 seconds.


GIF Edit
These are the photos that i took and put them into a gif to see what they would look like.
WWW: I like how i was coordinated and that the photos always start from the same place and how they progress into something more and more.
EBI: Not enough photos of the movement as they feel way too short and way too quick.
EBI: Not enough photos of the movement as they feel way too short and way too quick.
development 7
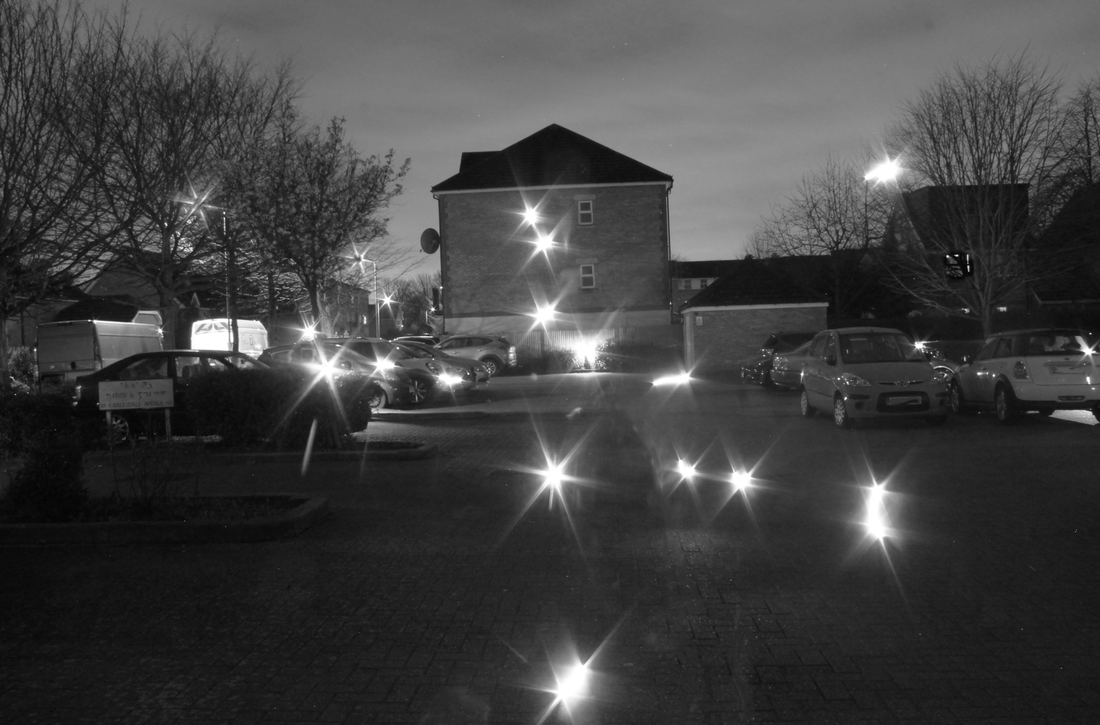
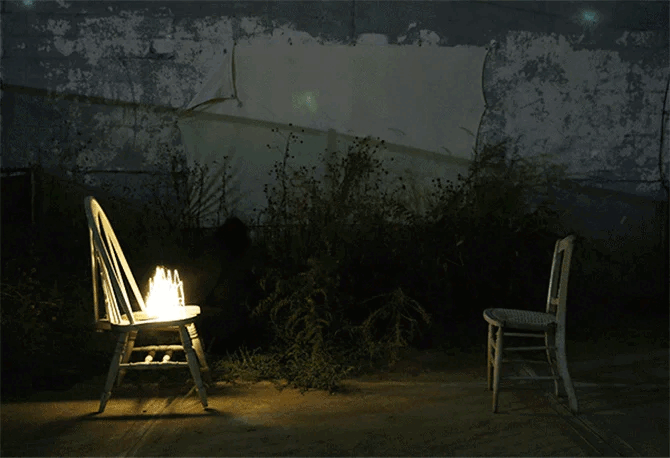
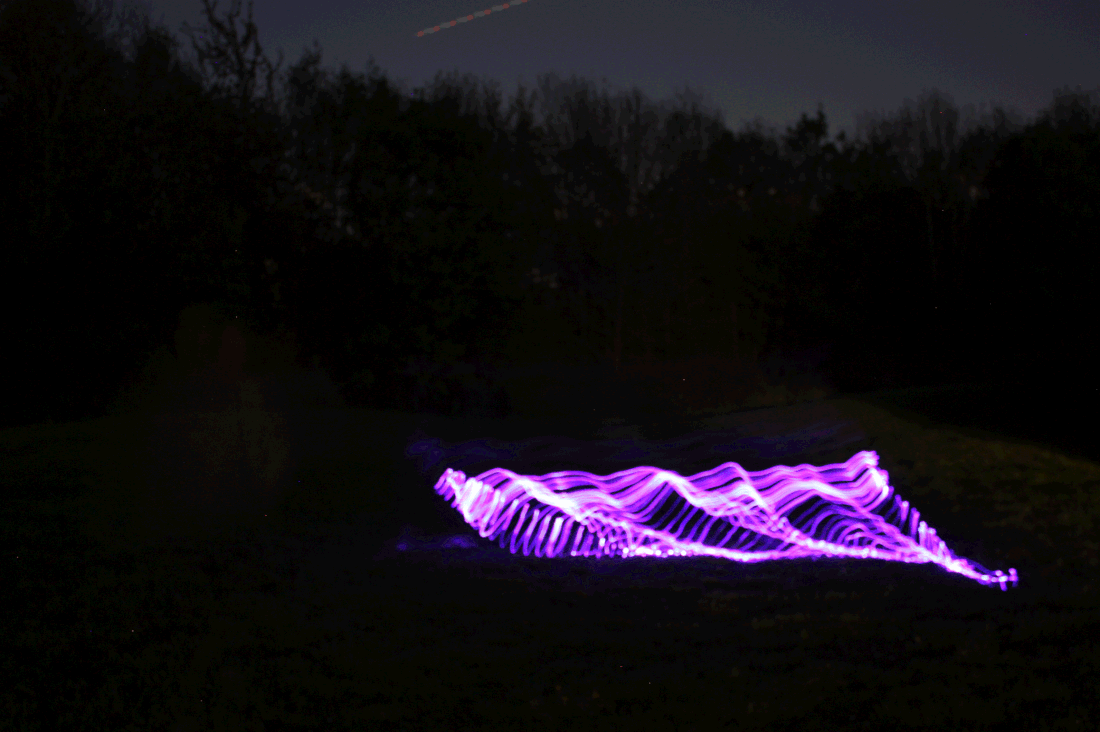
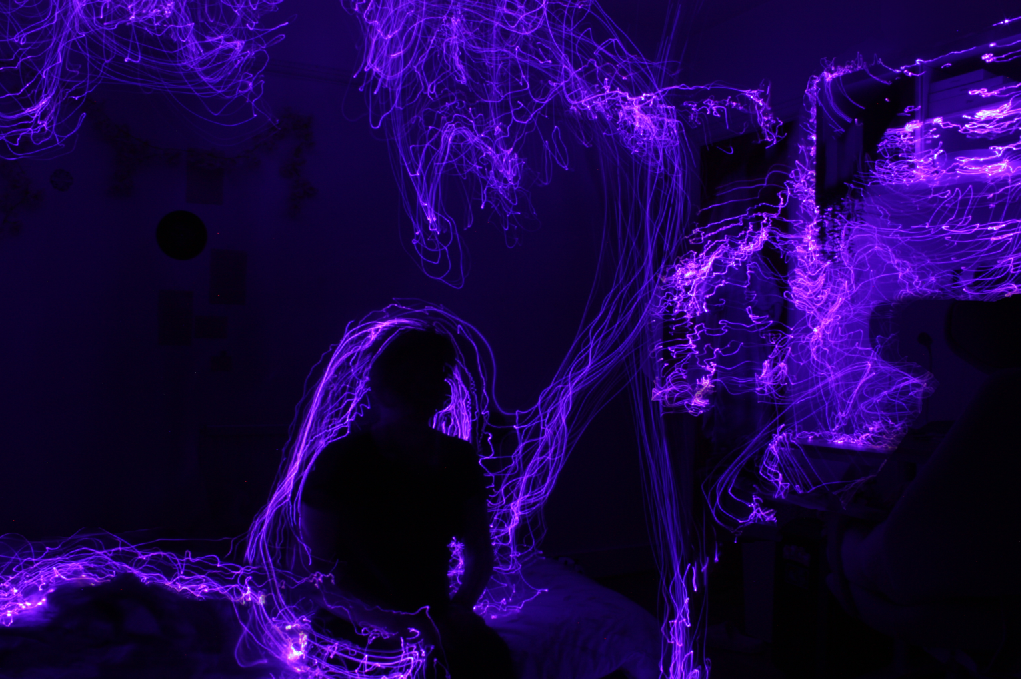
For this development i had used the movement of lights and objects I had mainly used chairs but I was able to create specific movement with them, i like how the photos had come out along with the fact that I had changed location again that was darker which isolated the lights and the chairs a lot more so that you can focus on them. For these photos i had a set iso of 200 and an exposuer time of 5-15 seconds depending on where i was with the light trail. i had used two chairs as props to bring them closer together which worked out really well.


GIF Edits
These are the photos in the gif format when they are all put together, I really like how they came out how its something new and something that I enjoyed doing and experimenting with it.
WWW: i like how the photos came out and how they are consistent along with i was able to set up points for my self and know where to start from and end each time.
EBI: more photos in-between, the photos don't feel that smooth and feel more cut up i should take more photos with smaller movements to make the photos look a lot better.
EBI: more photos in-between, the photos don't feel that smooth and feel more cut up i should take more photos with smaller movements to make the photos look a lot better.
Development 8
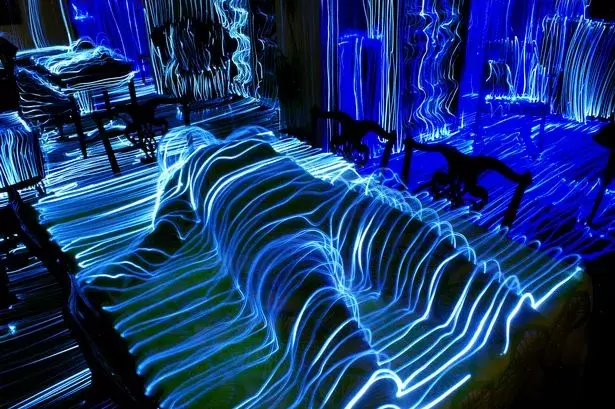
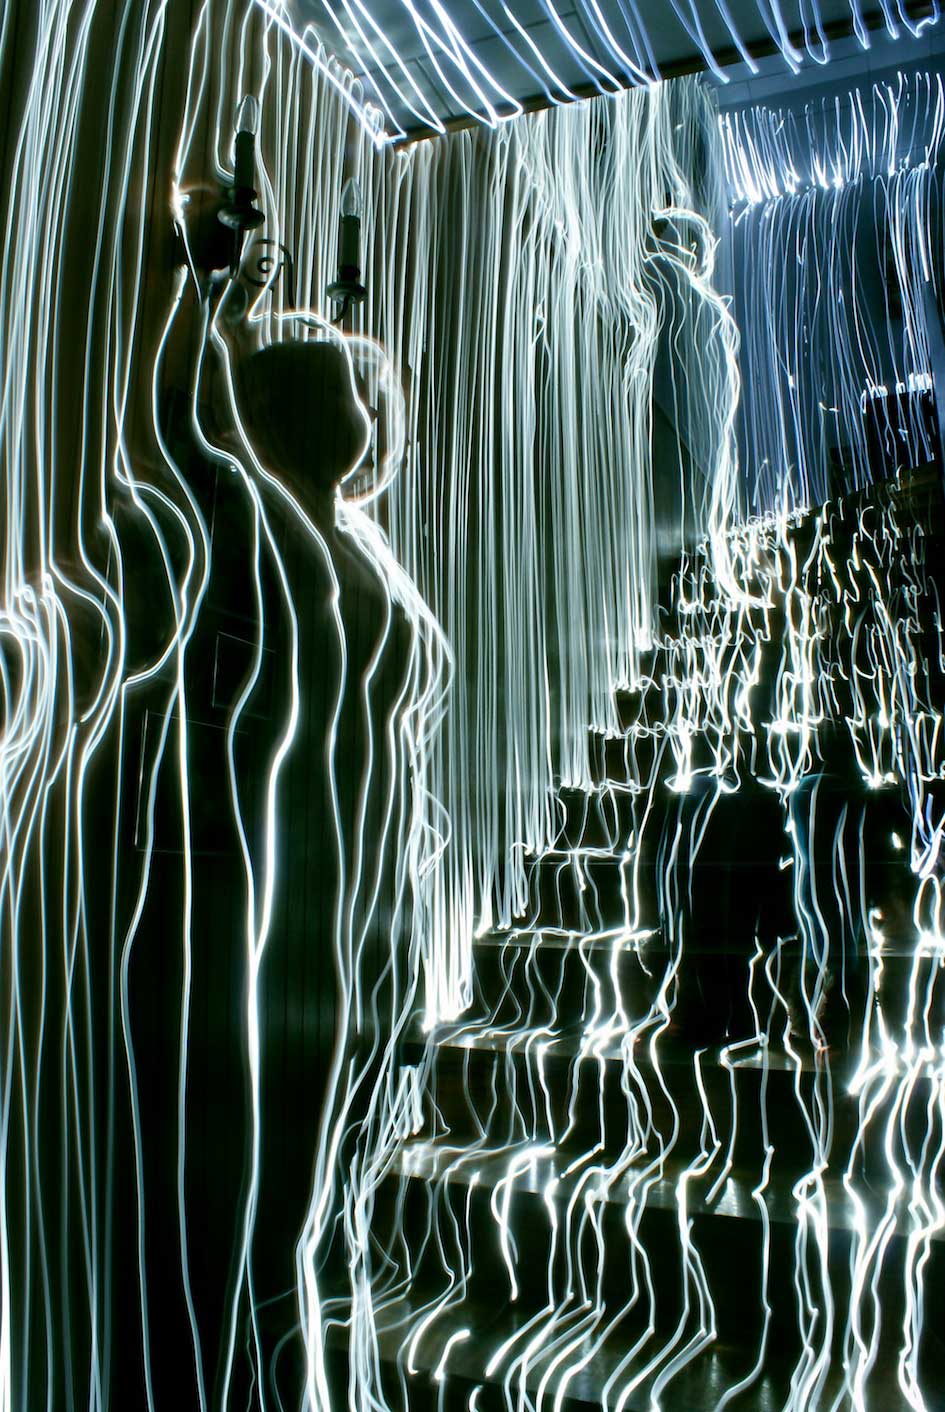
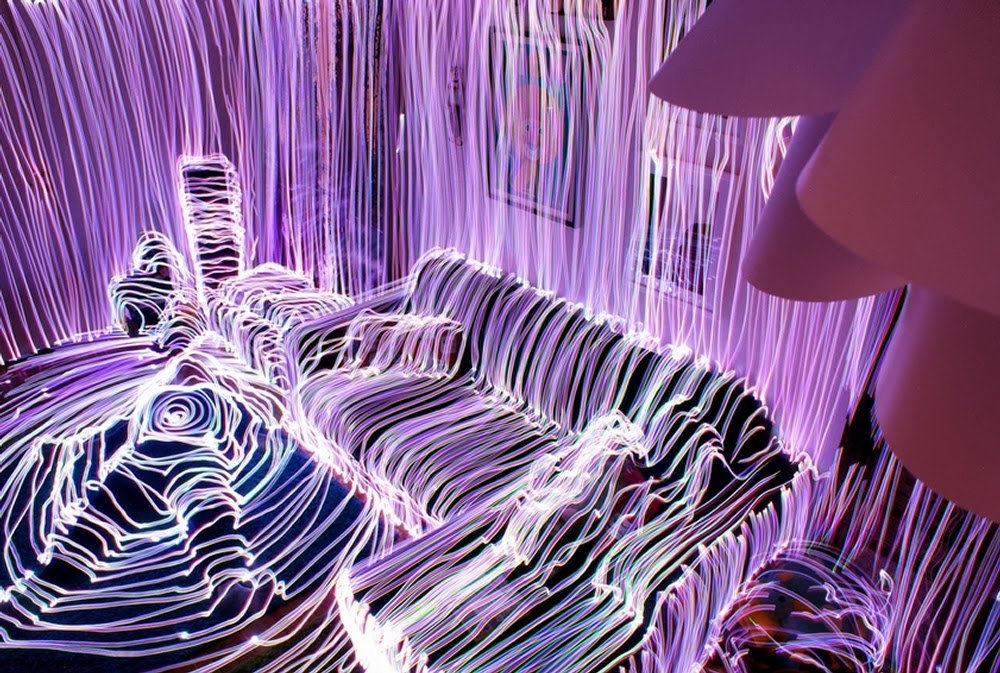
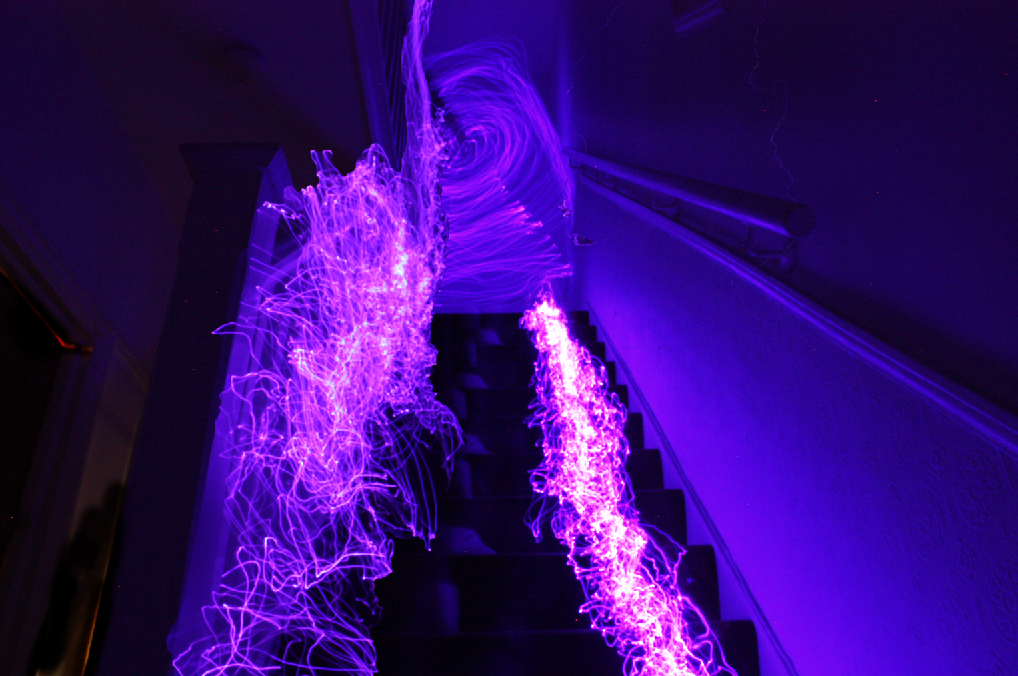
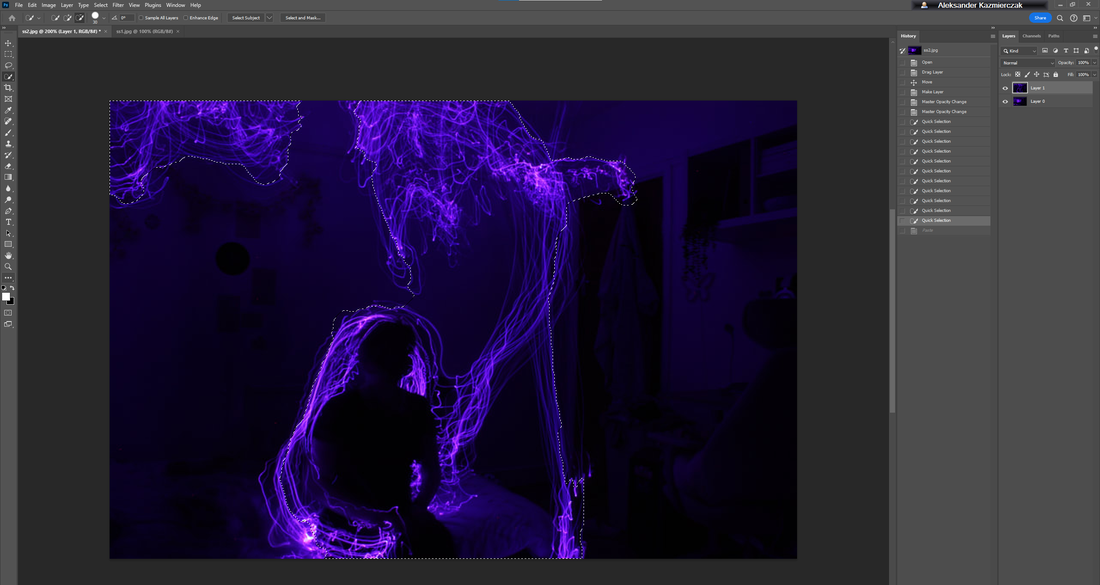
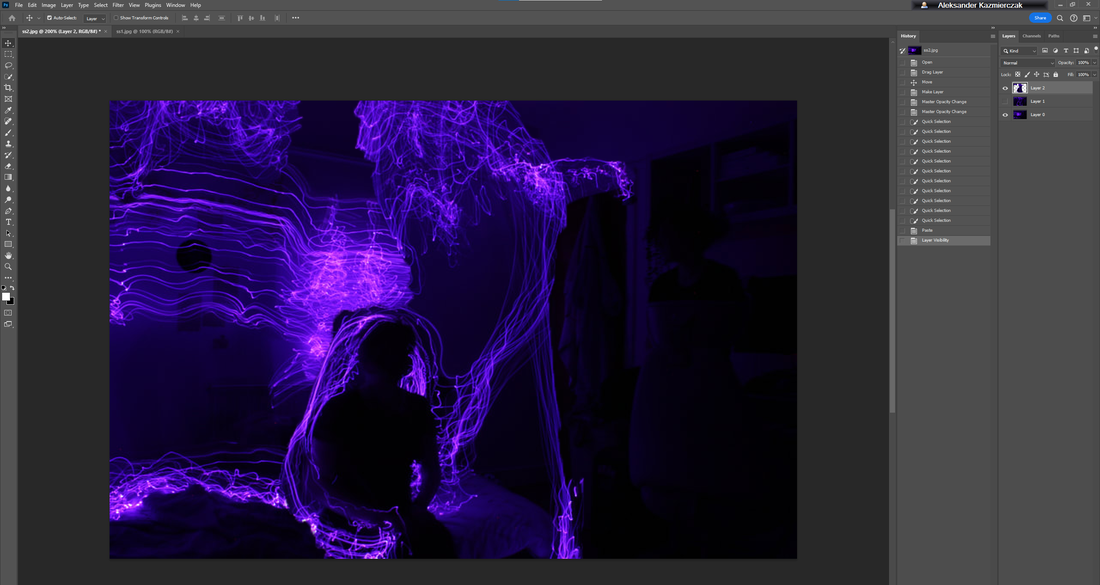
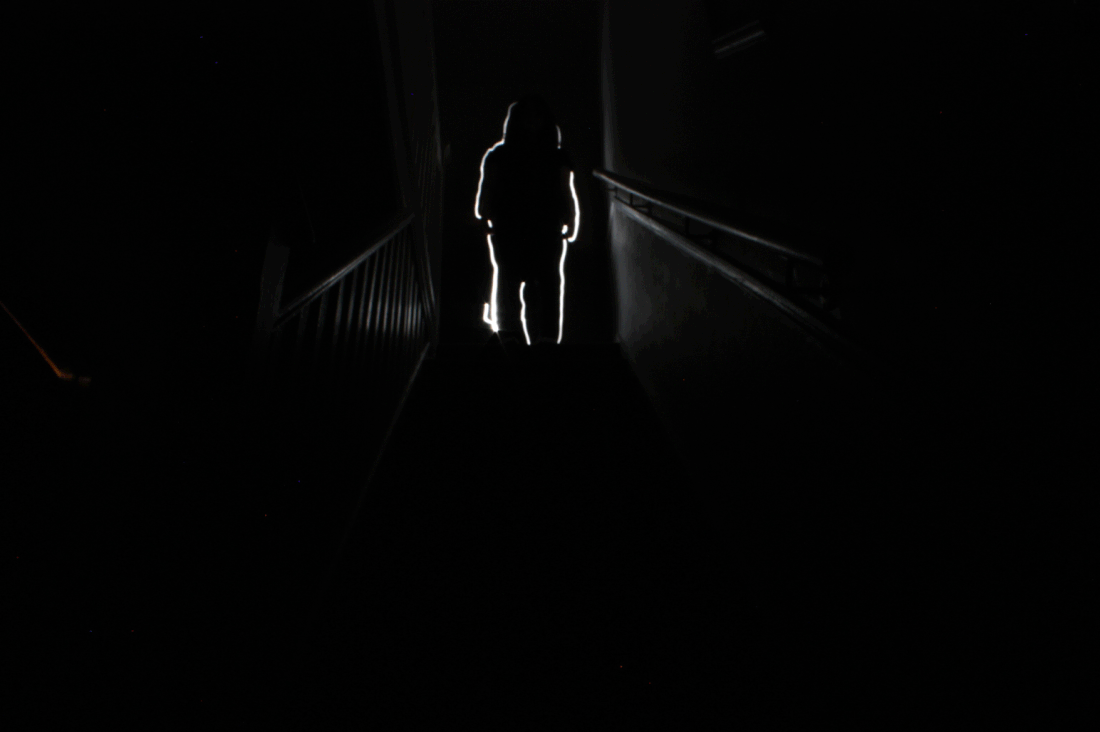
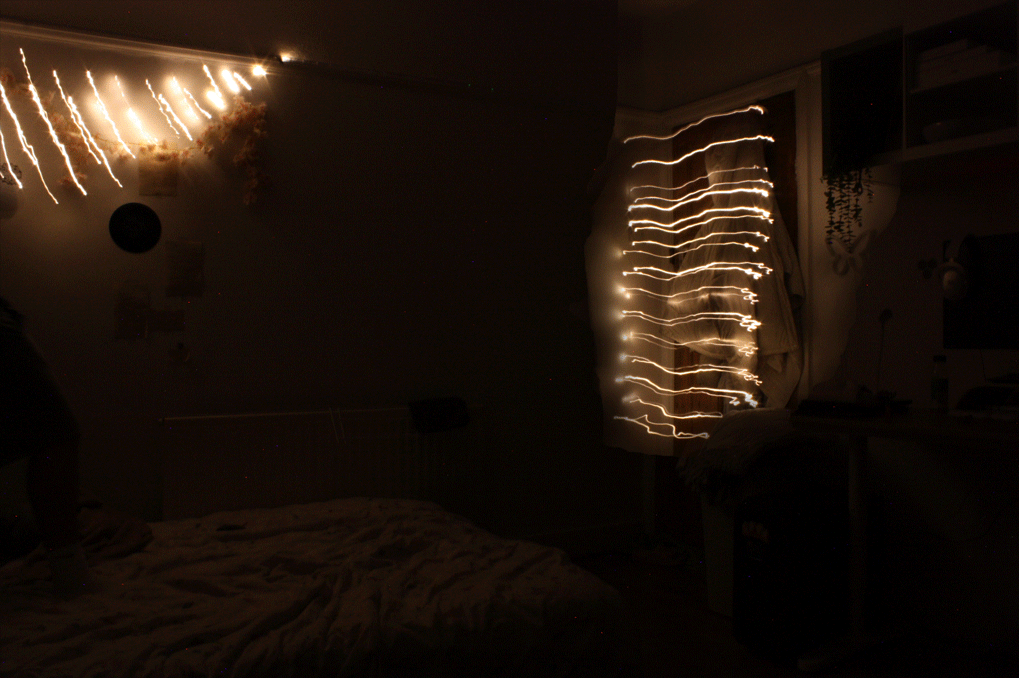
For this development I had looked at the work of Janne Parviainen, this is where he covers all the surrounding area with lights. i had tried to cover the whole area in one go but it was not working so i decided to take different parts of the room seperatly and then join then back together in photoshop, this made it a lot easier as i could focuse more on one area then haveing to rush everything.
|
|
|
My Response
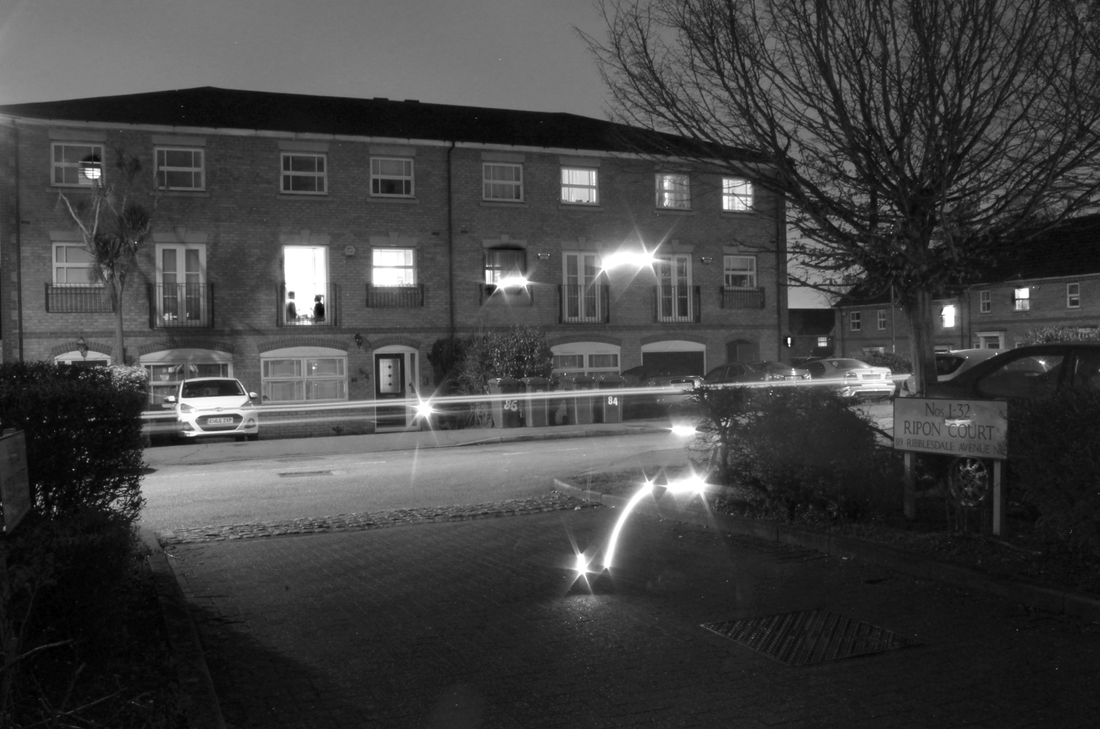
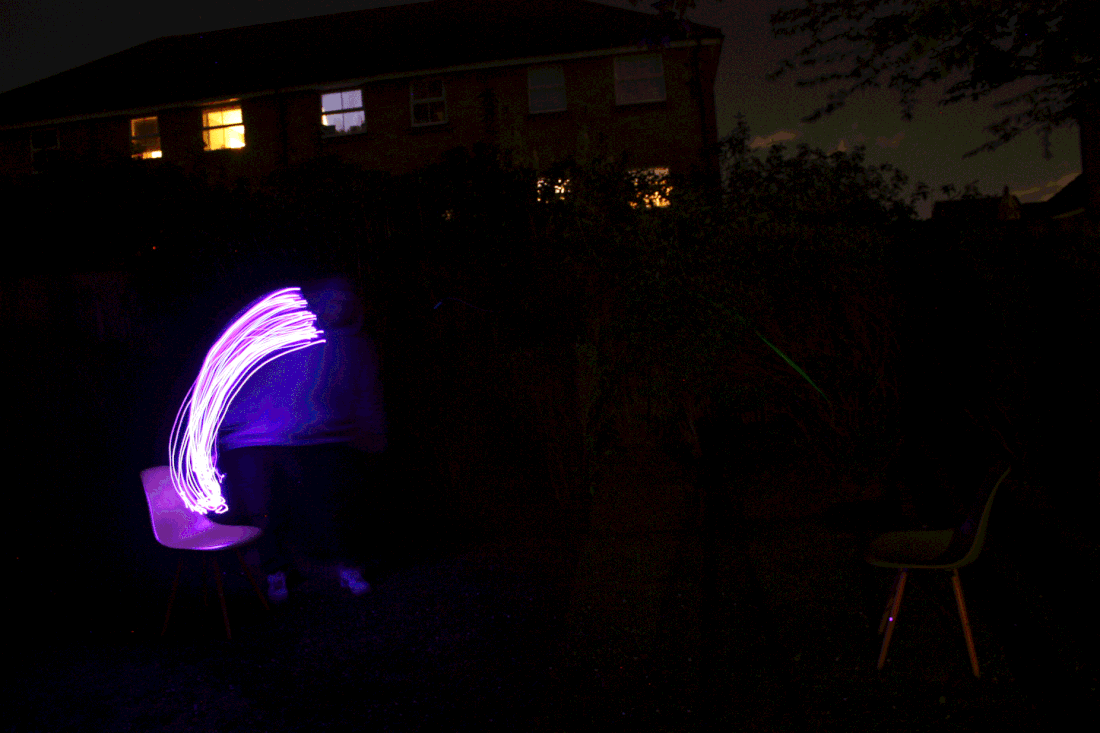
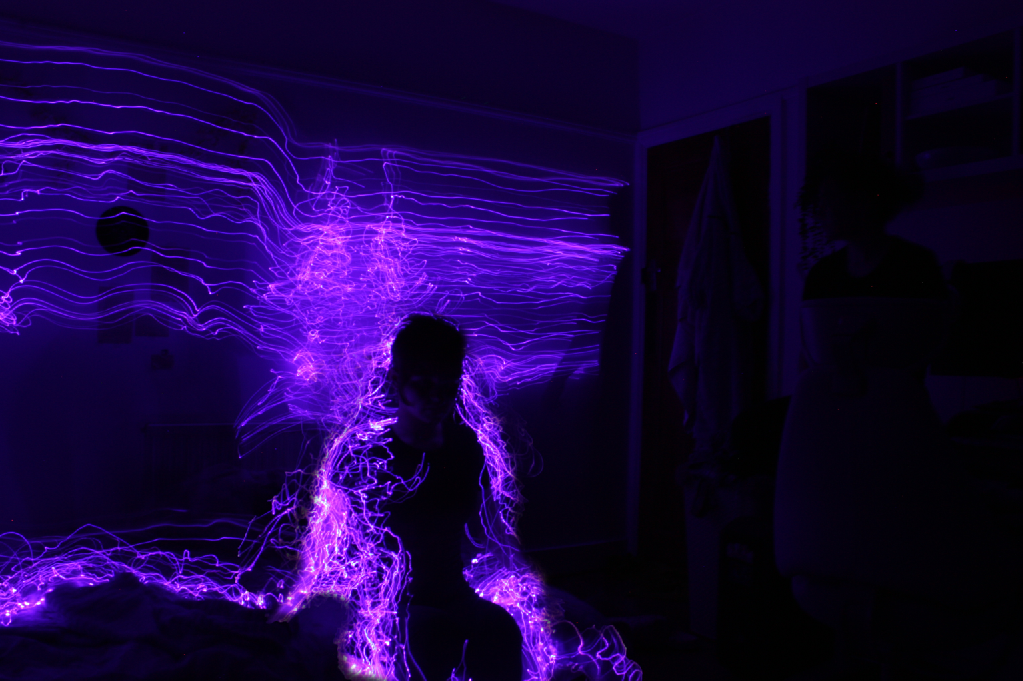
These are the photos that i had taken in response to Janne Parviainen, i had used both fairy lights and my phone light so that i could test out which was better. With the phone camera i got finer lines making it more easy to outline but with the fairy lights i was able to cover more area which made them really useful. I would also outline myself and overpeople to get the human like figuers in the photos which adds a human type factor back into my photos. Foe most of these photos i had an exposuer of 20-30 seconds as i had to cover a much bigger area and this allowed to get more time . I had also tried to outline myself which came out well in a few of the photos.


Edits
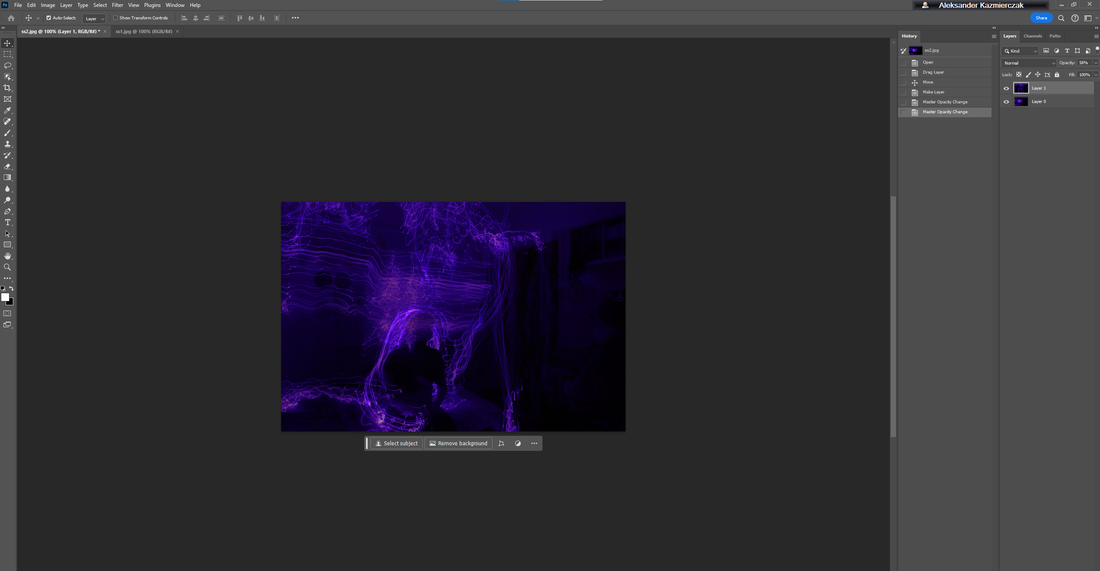
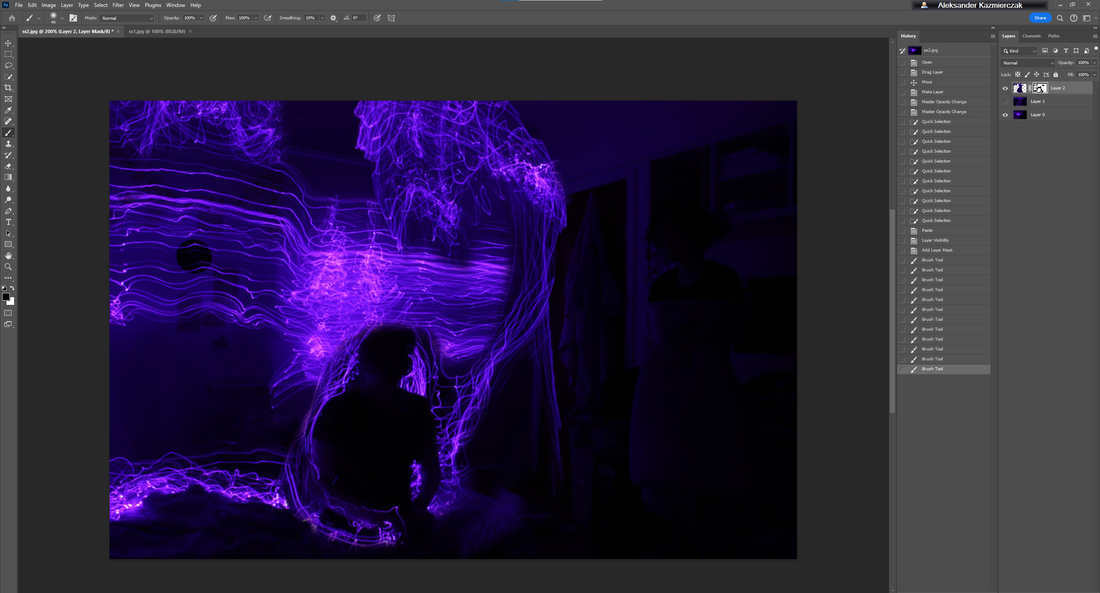
These are the edits that i did, i kept the camera in the same spot and focused on each area each time, i would then put these photos in photoshop and layer over each one and cut out each part of the photos that i needed for the layers to start coming through.
This is the process of how i made these photos, i would first layer the 2 over each other and turn down the opacity to see if i would like it, then i would just use the quick selection tool to mark out the area that I'm going to copy and paste, after i copy and paste i hide the layer so that its left with the cut out part and the first layer then i use the mask and brush to blend in the two to make them look good.
|
|
|
GIF
WWW: I feel like most of the photos came out well and i was able to join them and make them look as if its all part of one photo along with getting the figuer to come out really well and show the outlines of the body.
EBI: More control over the lights, i was mainly just throwing the lights around but with intent but i should get more control over them so the photos come out better.
EBI: More control over the lights, i was mainly just throwing the lights around but with intent but i should get more control over them so the photos come out better.
development 9
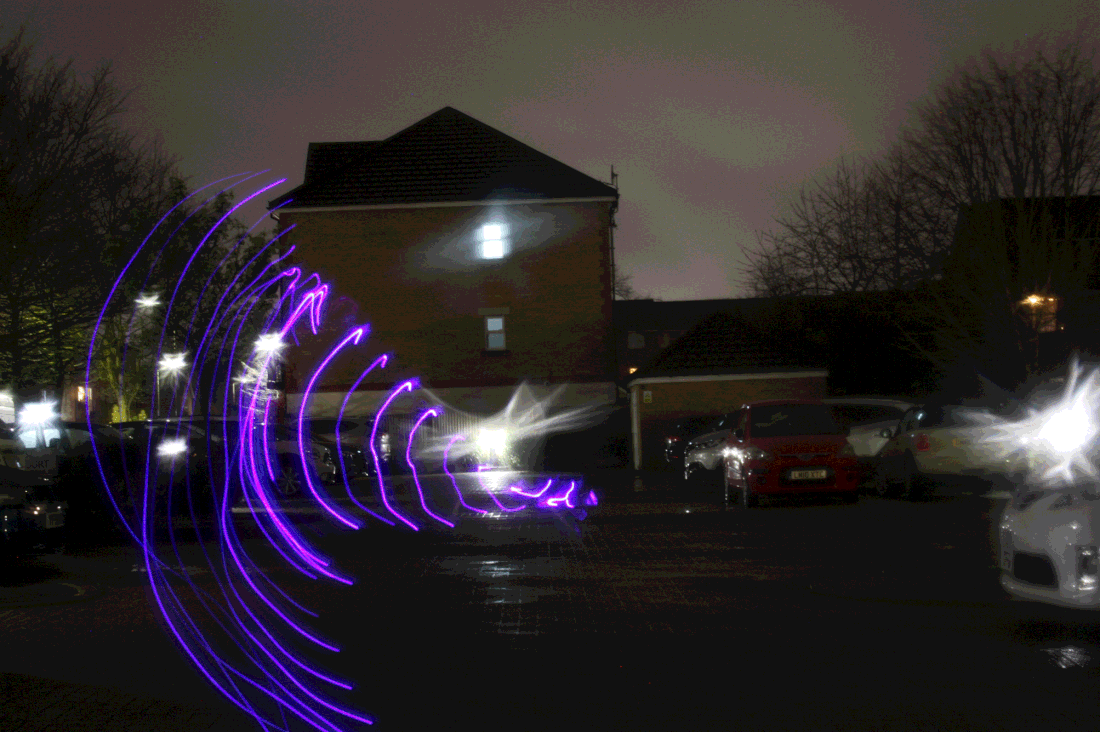
For this development i wanted to use my drone so i attached the lights to drone and wanted to capture light paintings in the sky, i was able to do this by setting up my camera in an open field and just fly my drone around with the camera going. I soon realised that the drone was too far away from the camera for it to capture the light and i was not able to do any of the main things i wanted. I played around with different settings within the camera along with iso and aperture and as well shutter speed but none of them really helped and it still only captured a small part of the trail in the sky.


Edits
These are the edits that i made, i had used the same technique that i used for my other edits to join them together as i did not move the camera i was able to join the lines together and make something more out of the little i had.
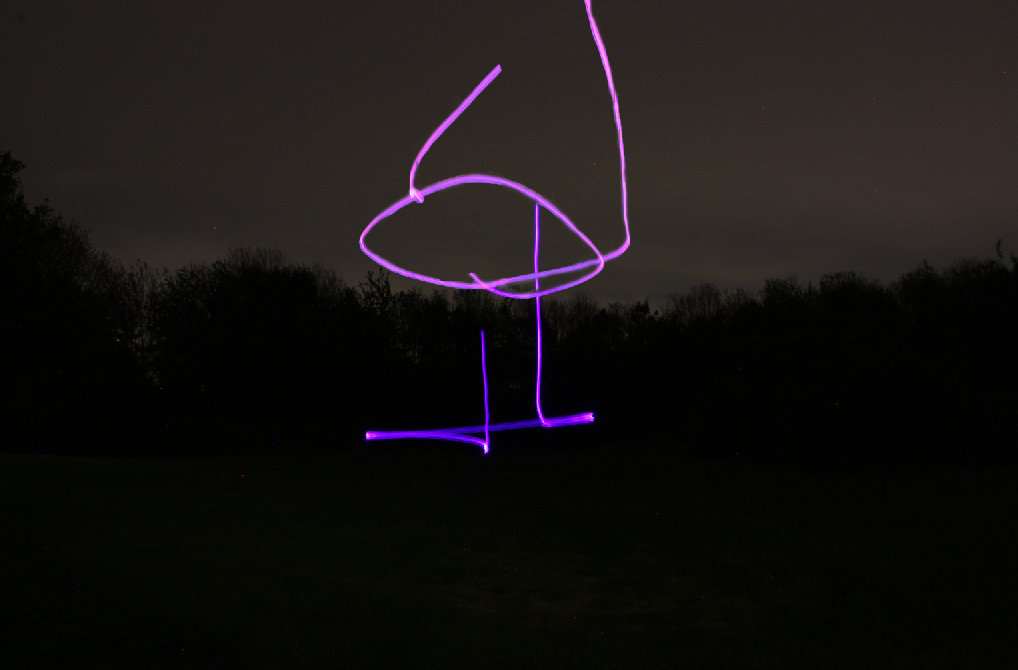
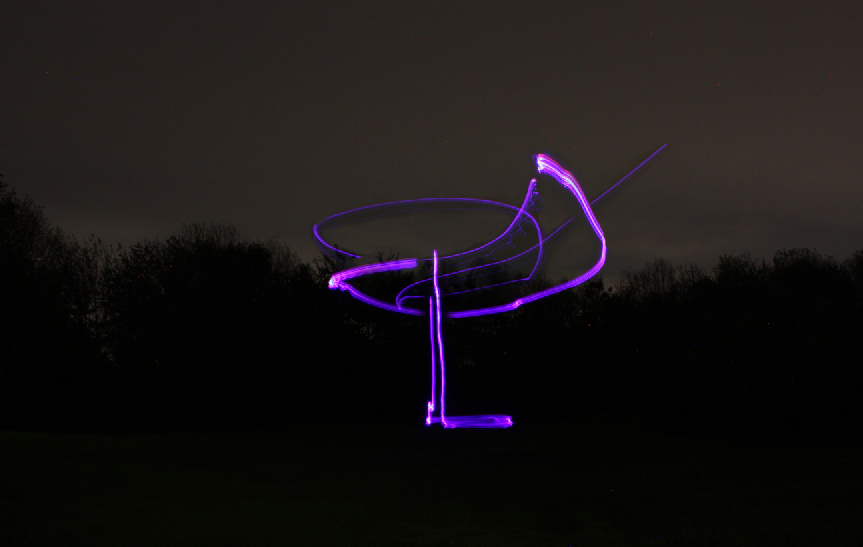
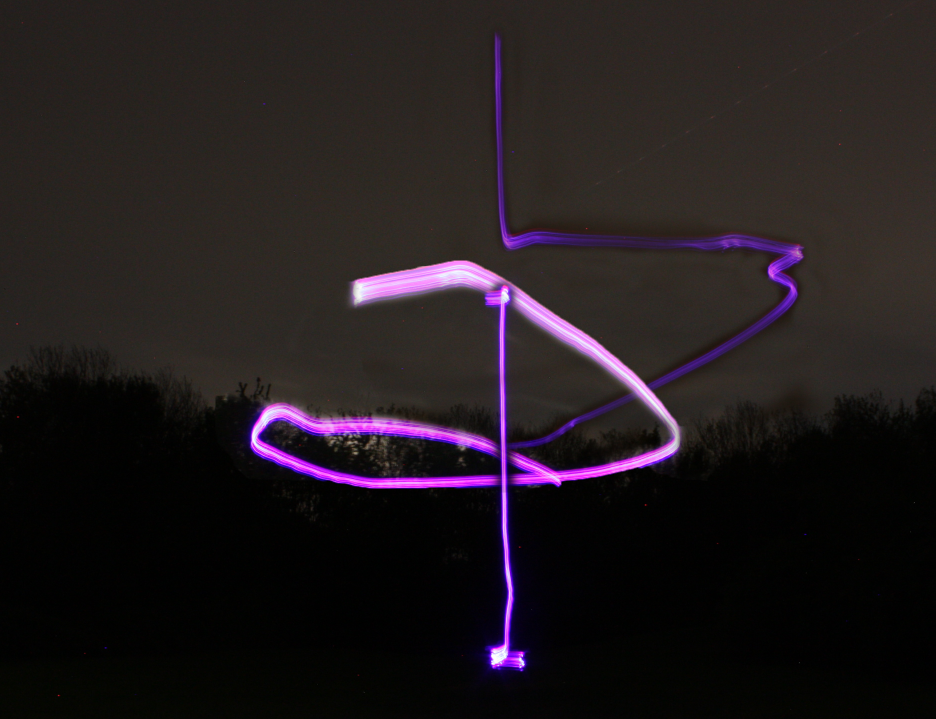
WWW: I got the lines in the sky that i wanted and i was able to captuer something you dont usally see
EBI: I need the drone to be closer to the camera as it was to far so it was not able to captuer all the lights that i wanted.
EBI: I need the drone to be closer to the camera as it was to far so it was not able to captuer all the lights that i wanted.
Final Piece
I decided to mix the last few projects together and try to put them into one, i had used the skills i learnt from my response to Janne Parviainen. I wanted to implement the skills i learnt from that i put in together with the light movement, i had covered the area in lights but its a process where the light moves to its point and then covers the area, i will also mix in together other parts of the room that move and have it into one GIF. I also had to change around the settings in some of these photos as a few of them where coming out a bit darker than i wanted them, I took up the iso from 200 to 400 and stayed with that along with an aperture of F18. With the shutter speed i was changing it, for example at the start of my light trail i would have a 5 second shutter speed and towards the end it was around 15 seconds.
Photos I Took
Edits
This is my final piece, I think these photos came out pretty well and I'm happy with the result, I had used skills and techniques that I figured out from the last few projects so this made it able to combine the two into one which I think it came out pretty well. The way I edited this, I did the same thing for the other project I would stack the two on top of each other and cut around the part I want to see and just cut it, which then revels the underneath layer. and then I had added movement to the photos by slowly adding more to each photo and capturing each progress. I just had to put the two together and turn it into a gif. I also wanted to include the human figure into the photos as well which came out pretty well. I had used a set of yellow/gold fairy lights which came out with this really good shining light in a straight line.
WWW: I think the photos came out really well after the edit and that I was able to figure out and to make 2 gifs in one. I have a lot of photos as well which made the photos look really smooth in the gif
EBI: some of the photos are really dark and its quite hard to see and I should have turned up the iso.
